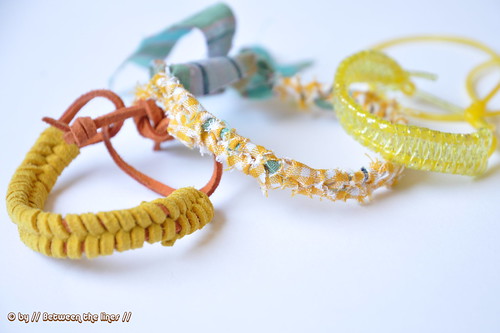
When M. came home from her camp with school, she showed me this yellow bracelet she made with 'scoubidoo' strings. One of her friends taught her how to make these and of course I wanted to have a go at it too. Instead of scoubidou string I used strips of fabric for one and leather - what did you think?!- shoelaces in offsetting colors for another one. I believe both resulting bracelets look really nice. The possibilities in terms of material to braid with are endless. How about tall beach grass or just hemp cord?
So, in case you 're in need of a fun summer project here's a how-to in 16 pictures with a short description below. I could probably have done with less photos - it's just that I had fun taking pictures...
This is what you'll need for an adult size leather bracelet. (You might have to adjust depending on the material you use, so make sure to do a try-out before cutting ends.):
- a 52cm long strip of fabric or leather shoe lace
- a second strip of fabric or leather shoe lace of approximately 95 cm
- a big-eyed needle
- a cylindrical object to hold the loop so your project stays put while braiding (the neck of an Elmer's glue bottle works just fine; when out on the beach, the finger of a helper's hand might do the trick as well)
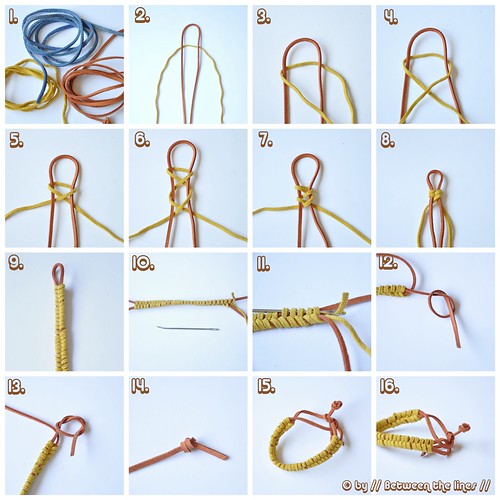
Steps:
1. Fold both strands in half and place the shorter one on top of the longer one as shown in picture 2.
2. Start braiding as shown in pictures 3 through 8, making sure to pull the strings evenly - I made my bracelet really tight but you could make a looser version by pulling less on the strings you braid with.
3. Continue like this until you reach the end of the strands you're braiding with.
4. Hide the loose ends in the braid as shown in pictures 10-11, using a big-eyed needle.
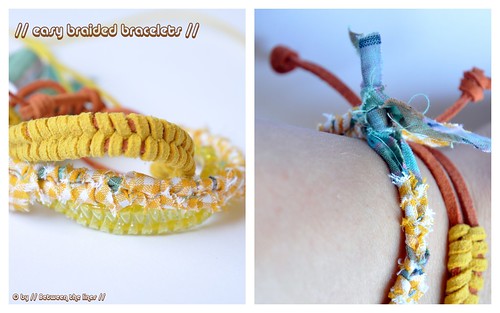
5. Tie a overhand knot in both remaining loose ends as shown in pictures 12-14 and here.
6. Put it around your wrist, pull one of the ends through the loop and (have someone help you to) make a double knot and your bracelet is ready to wear!
This is the kind of craft you could easily do with kids - have them cut strips of fabric, no need to worry about the strips being straight and regular, and teach them how to braid. It's a good exercise for fine motor skills, and because it's repetitive it's very relaxing too. Use the resulting braid as a bracelet, anklet, key chain, headband... Once you've got the hang of it, or if you want to take this project to the next level, slip some beads on the longest one of your strings before you start and braid them in by slipping them down one by one as you go.
With special thanks to my little girl M. for teaching me how to make these...

