Showing posts with label repurposing. Show all posts

July 31, 2013

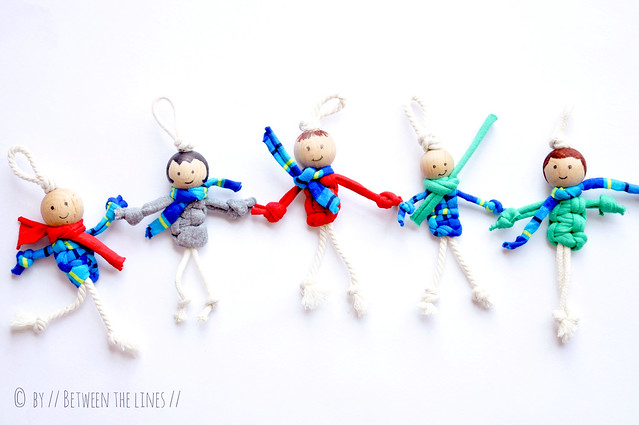
T-shirt yarn macramé puppets

T-shirt yarn macramé puppets

Sitting on a mountain of old T-shirts?
Bought some T-shirt yarn but never got around crocheting or knitting that rug?
Or did you make that rug but you still have yarn left?
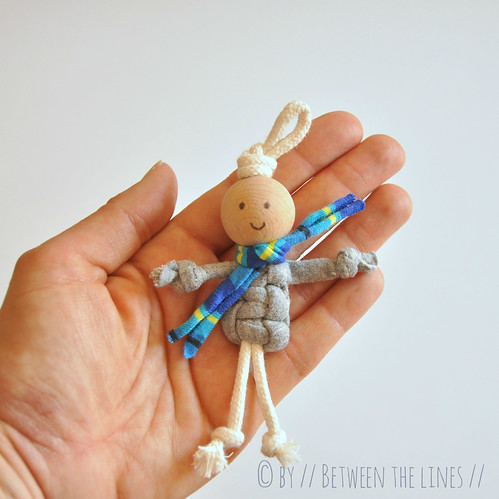
Here's a fun craft making use of T-shirt yarn.

T-shirt yarn macramé puppets


These T-shirt yarn puppets were part of our school's Spring fair activities last June and I can immediately add that they were a big hit among all ages.
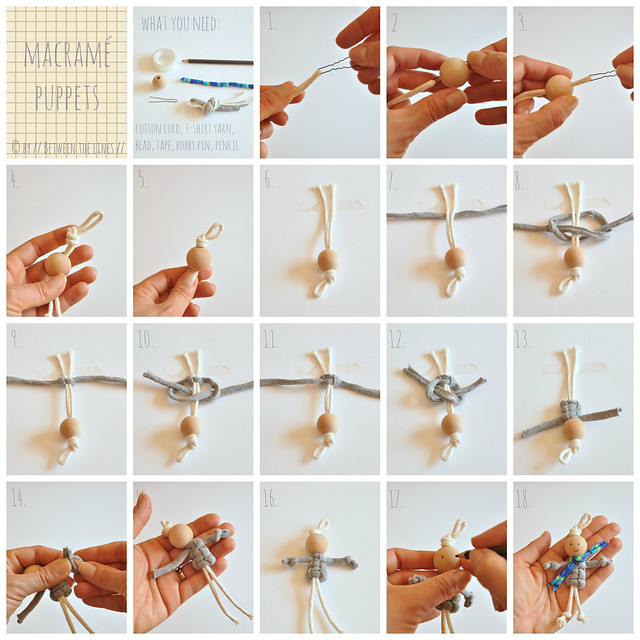
It's a nice introduction to macramé as well.
If you don't have T-shirt yarn you can cut your own from old T-shirts (you can find how to do this online). Or you could use fabric strips, bias tape, cord, ribbon, ...

Slip the puppets on a key chain, use them to personalize school bags or make a bunch to make a cute mobile or garland for the nursery.

Recommended age: 5+
Required skills: ability to tie a knot
Click here to download written instructions.

T-shirt yarn macramé puppets

Note: inspiration for this craft was found here. Just now, I also found this tutorial online.

As with all of my tutorials, please note, this tutorial is intended for personal use only. Therefore, do not reproduce, sell or commercialize in any form. Thanks for understanding!

If you made something using a tutorial found on this blog or if you got inspired by something you found here, make sure to post your pictures here.


November 21, 2012

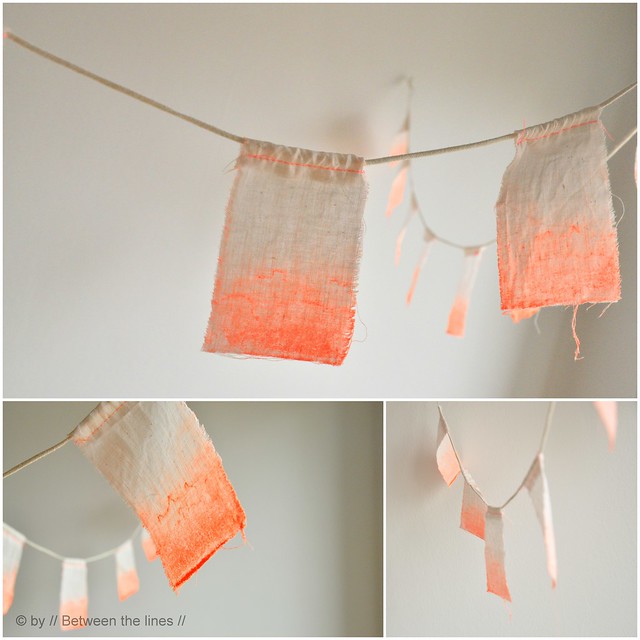
Ombre bunting flags

fluo ombre

I haven't been here for a while, which doesn't mean I haven't been busy. Quite the contrary, actually.
I'm working on what I believe will be a very cool, fully leather bag. Venturing hand sewing leather, using sharp and scary needles... Yikes! But if everything continues to go as planned, it will be a nice bag. One to be proud of. And I hope to be able to show you the result soon...

fluo ombre

In the meantime: a fun, fast, cheap and easy craft - just the way we like it.
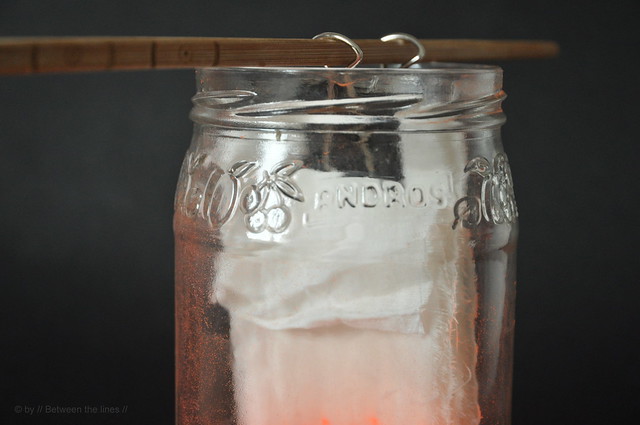
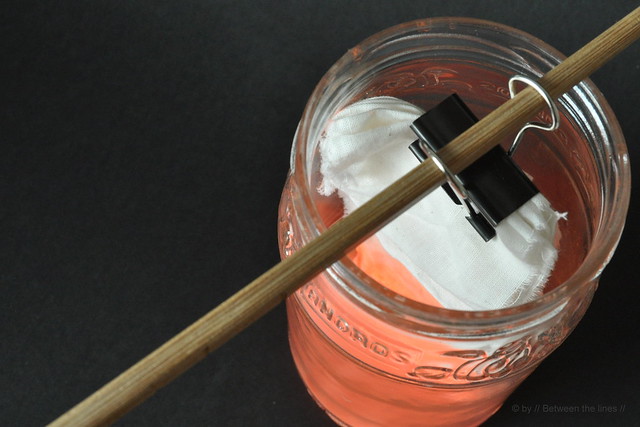
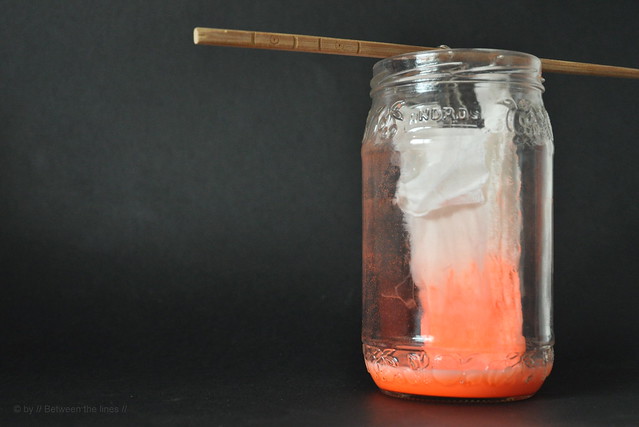
I had some fluorescent paint left from my previous project and decided to dilute it to see if it would work to get the lately much wanted ombre effect.

fluo ombre

fluo ombre

I ripped a band of flimsy cotton, folded it accordion-wise and hung it in a jar which I filled with about an inch of the water-paint mixture. I let it sit for a while (I actually enjoyed watching the fabric soaking up the paint), next hung it to dry. Once dry, I cut it in small rectangular pieces (at the folds), sewed a tunnel with fluorescent thread and threaded the rectangles onto some cotton rope.
I didn't bother to cut of loose ends as I like a slightly ragged look.
And that's it!

And now, back to work!

Wishing you a great rest of the week and a happy Thanksgiving for those of you celebrating!

Cheers,

P.

October 24, 2012

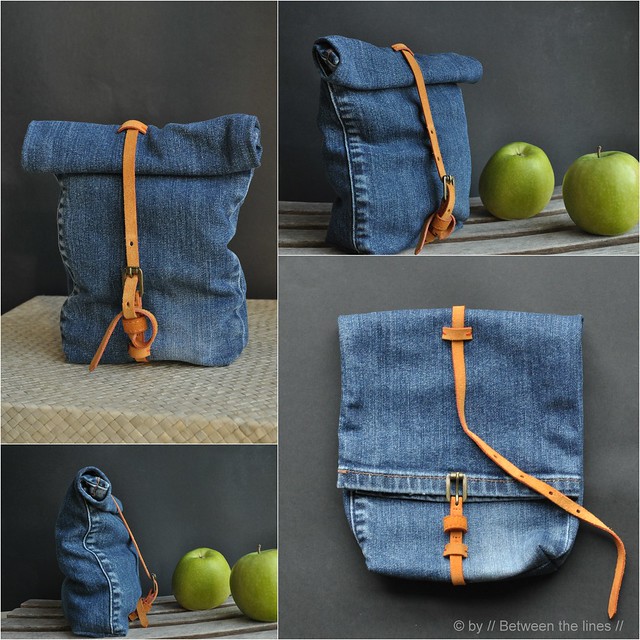
Denim snack bag :: a recycling project

denim snack bag :: a recycling project

I'm maybe not very original with this project. You can find tutorials for this kind of (snack) bags everywhere on the net. Derived from the paper brown bag, they're very simple to make. When using old pants, however, they're even simpler to make, is what I thought.

I used an old pair of jeans, which were ripped at the knees, and let's face it, which also got a little too tight around the waist... For the strap, I used a thin, orange leather, partly torn belt (the top and bottom layers got separated beyond repair this time).

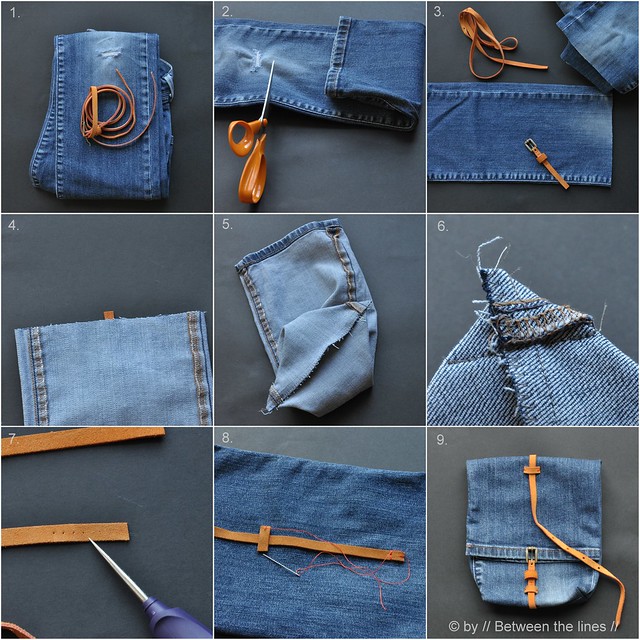
The project is kind of straightforward and summarized in the pictures below. I probably won't use my bag as a snack bag but rather as a make-up bag. The second leg will be transformed in a similar way, and will hold our adapters, cell phone loaders etc. when traveling.

Just one remark before you get started: the size of the bag obviously is determined by the width of the pants' legs. Hence, I do not recommend using slim pants. Straight leg pants and boot cuts, however, are just perfect for the job!


You will need: an old pair of pants, an old belt, needle and thread, and a sewing machine (although you could do this project entirely by hand).

denim snack bag :: a recycling project

Instructions:

1. Cut off one leg, just below knee, with adult size pants, about 40cm.

2. Prepare your belt by cutting the following:
- one strap of about 10 cm, buckle included and still attached
- another strap of about 40 cm, starting to measure from the other extremity of the belt (so this part has the holes)
- two strips of about 3cm, each.
3.  Turn the leg inside out. Since the bottom seam will become the top of the bag, we will close the other end. Insert the belt part with buckle, at that end, making sure it's positioned right in the middle. Close the seam, and run a zigzag stitch to prevent fraying.

4. Make boxed corners as shown.

5. Attach the other strap, nicely centered in the back. To make the sewing easier, prepare the leather by making holes using an awl. Next, add the short strips with a couple of stitches. If you're smart, unlike me, you attach the strap and strips before sewing the bottom seam...

And that's it! Hope you like it...

Cheers,

P.

PS: If you made something using a tutorial found on this blog or if you got inspired by something you found here, make sure to post your pictures here.

September 28, 2012

Animal Key Chain :: DIY

Animal Key Chain :: DIY


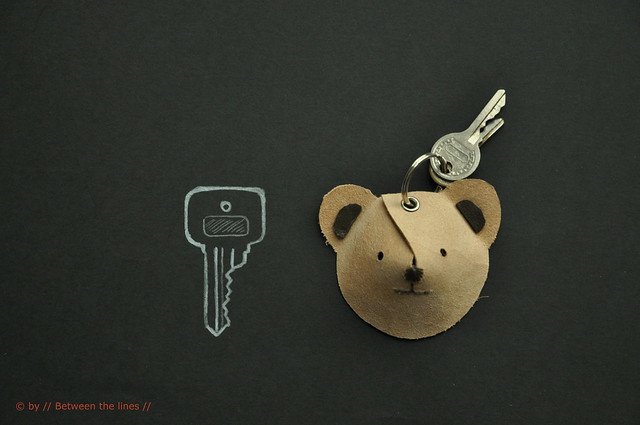
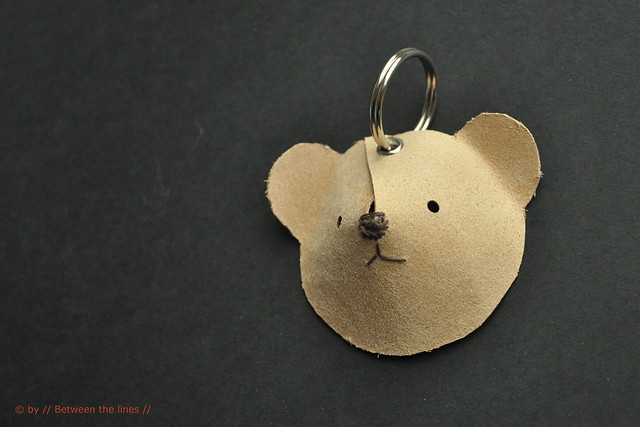
Last week, while I was working on the leather key holder, I had an aha-moment. On top of one of H's birthday presents, last summer, sat a cute 3D card stock bear head/tag. Because I thought it was so cute I rescued the little bear from the recycling bin and it'd been sitting on my desk ever since. Until last week, that is.

Animal Key Chain :: DIY

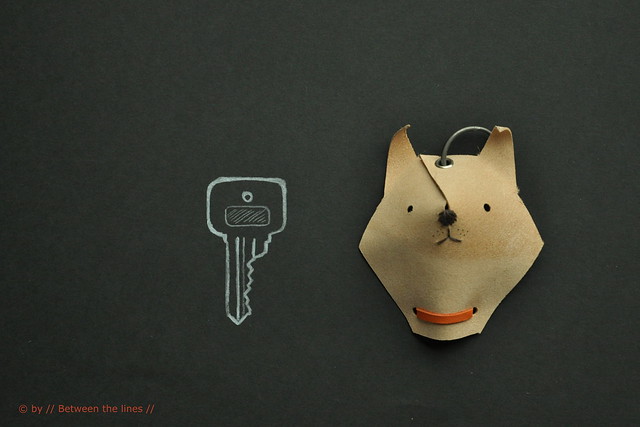
All of a sudden, I new what I wanted to do with it - make a replica in leather and use it to hang on a key chain. And that's exactly what I did. I tweaked the design here and there and even came up with a little fellow critter. So easy to make and according to my girls very cute (do I need to tell the little critters have been claimed already ?).

Animal Key Chain :: DIY

Use sturdy leather for this project (I used low grade but rather stiff leather for mine). Besides leather, you will also need a (leather) needle and thread, an eyelet and eyelet setter, and a key ring. Skip the sewing and have your little ones decorate their bear or dog head with markers, if you like. Punch a couple of holes for the eyes. To keep everything together and give the head its 3D shape, slam an eyelet through the top as shown in the template, attach a king ring and you're done.

 Animal Key Chain :: DIY

Wouldn't these make cute party favors? Or how about making a whole bunch of them to decorate your Christmas tree. And if you're good at drawing (which I'm not), try making different animal heads. If you do so, feel free to post them in my Flickr group - I'd love to see which animals you come up with!

Note: if you can't find leather, try using other materials like vinyl, or foam sheets, heavy weight felt, ... as long the material used has a certain stiffness this should work!

July 16, 2012

I know...

... which bag I'll be taking to the market tomorrow...

Denim flowers


bag here
flowers here

Denim Flowers :: a DIY


 denim flowers :: a DIY

It's been a while again since my last post, but I'm still here. As a matter of fact we just got back this morning from a short break at the seaside. Summer vacation started exactly two weeks ago and we've been extremely busy.   I even missed my beach bag tutorial going live on Design*Sponge! Yes, you read that correctly - Design*Sponge! It surely made my day! And if you're still planning on making one too, make sure to check out the article as there are more step-by-step pictures on D*S than in the original post.

denim flowers :: a DIY

And here's yet another tutorial - after more than two weeks spent without having touched any fabric, needle and thread, or doing anything creative, I could no longer resist! Inspiration, was the lovely leather flower brooch I got myself during the sales here in Paris.  It got me thinking and I came up with a denim flower, made from old jeans (which had been cut to pieces anyway for other projects).
 

 It's a very simple but rewarding craft. A kid could do it -  it could make a nice craft for a rainy afternoon, actually. Find the step-by-step instructions in the photo-collage below. Sew a pin at the back and use the flowers to spruce up a plain shirt or jacket. Or how about making a bunch and sewing them on a tote or pillow. The possibilities are endless and really, all it takes is 15 minutes. 
denim flowers :: a DIY

To have slight color variances between petal layers, I used pieces of fabric from two different pair of jeans. The flower petals are cut  'free-style' which adds to the charm of the flower. For an even more frayed look, I suggest to throw the finished flower in the washing machine and dryer. Give it a try, you can't go wrong on this one! Have fun!!

June 28, 2012

Mesh Beach Bag Tutorial!!


Mesh Beach Bag

Only three more school days before Summer vacation begins here! And no, I'm not ready yet! The past couple of weeks have been extremely busy - I thought with the kids growing up things would get easier but it's quite the contrary, bringing them from one place to the other, from one activity, party, event to the next has been challenging.

More than once during those past few weeks, I've been wanting to escape to our little place near the beach. Not because the weather has been that great (which it hasn't) but just because of the peace the sea, the sand, the wind, the air seem to bring along.
I love all of it... except maybe for the sand everyone brings into the house, including me.

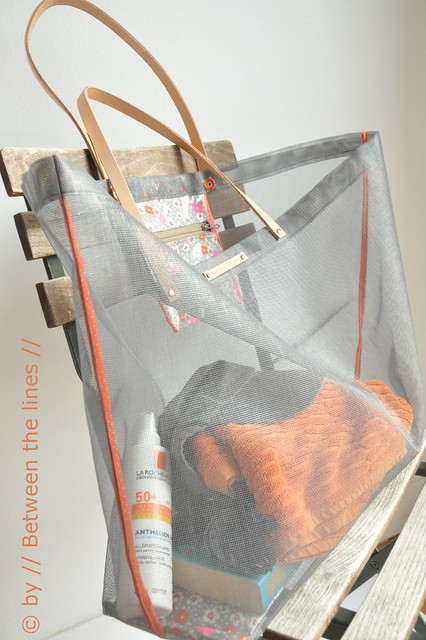
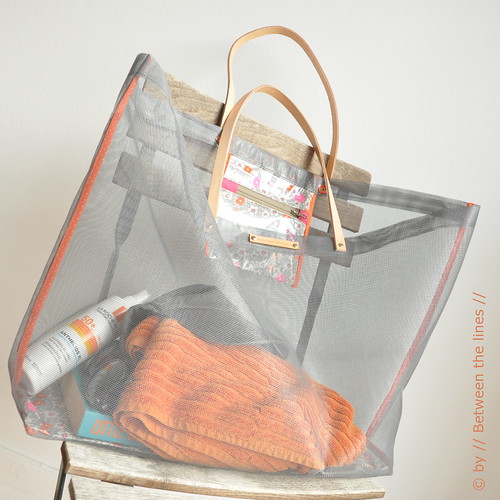
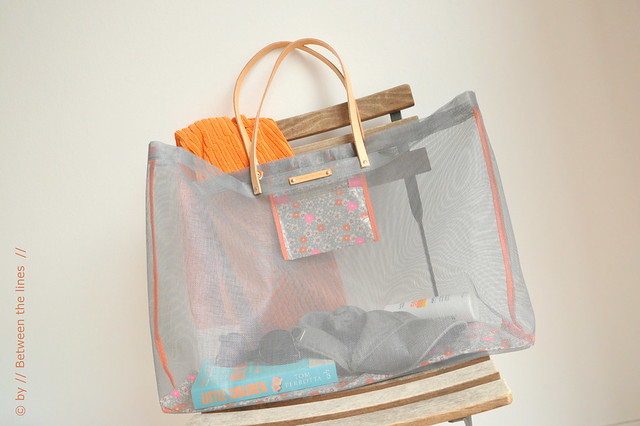
But now I've got the solution for a sand-free home. As off now we'll be using this special beach bag made out of... window screen material! Yes, you saw that right! The exact same kind of screen used to keep away mosquitoes and other annoying bugs! You can buy it by the yard/meter at any hardware store.

I came up with this idea after seeing a lady at the Friday morning market with the most interesting mesh bag. As a matter of fact, the bag was so interesting I started talking to her. It was over 15 years old and still in perfect shape and no, they weren't for sale anymore. But it got me thinking...
Mesh Beach Bag

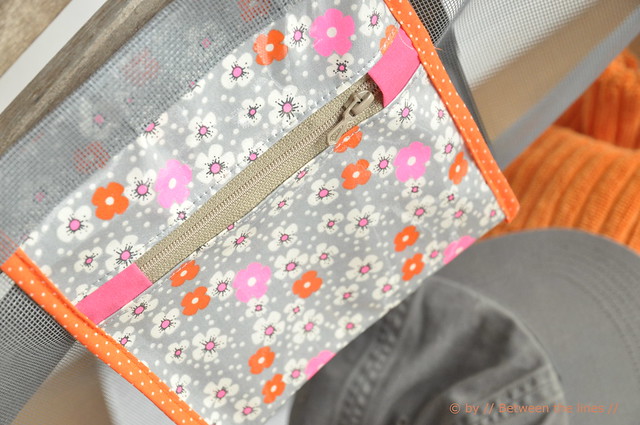
So here you got it, with a tutorial and everything. The original idea was much simpler than what I eventually came up with.  As I went, I added an oilcloth zippered pouch to safely put away those keys and some loose change for an ice cream. I also covered all seams with fabric bias tape and gave the bag an oilcloth bottom for sturdiness, which is attached to the bag at one side only. That way, you can lift it and all sand can be shaken out. Sure enough, sand will come in, but eventually, it also will come out with this type of mesh bag. Wet towels can air and everything put in the bag is within reach and visible.

So here's a new tutorial - it's been a while - I hope you'll like this bag as much as I do. And as it turns out, this is a project you could easily make re-purposing stuff you may have lying around: and old mesh window screen, an old oil cloth table cloth, an unused belt for the handles, ...


This is what you'll need:

- window screen material (moustiquaire in French - muggengaas in Dutch), new or used, 66 x100 cm
- a piece of plastic for the bottom - the Clover ones work fine, but any other piece of plastic/wood/ board would work evenly well.  13 x 51 cm (it can be cut to size)
- a piece of oilcloth, new or used, enough to cover the board and to make a zippered pouch (optional)
- bias tape, enough to cover side and bottom seams, and the zippered pouch side seams
- 15 cm zipper for the zippered pouch (optional)
- leather strip for handles (note: if you can't find any leather, you can use oilcloth or a piece of fabric to make your own handles)
- rivets to attach handles
- hole punch
- scissors, thread
- sewing machine

Mesh Beach Bag

Instructions


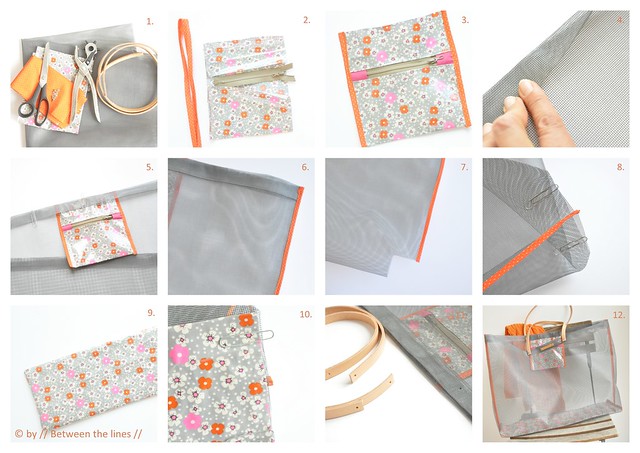
Zippered pouch (optional): (pictures 2 and 3)

1. Cut the following out of oil cloth:
- 1 rectangle, sized 17 x 6 cm
- 1 rectangle, sized 17 x 28 cm 
2. With the zipper facing the right side of the smallest piece of oilcloth, attach one side of the zipper. Fold over and top stitch. Repeat for the other zipper half and the largest rectangle. Top stitch.

3. Fold in half to form pocket and close side seams on the right side, about 0.5 cm from edge. Finish seam with bias tape (if you're a confident sewer you can do this in one go). Repeat for the other side seam: close on right side and cover with bias tape. No need to sew the top of the pocket closed as this part will be incorporated in the top hem of the bag.
Mesh Beach Bag


Bag Assembly 
1. Top hems (pic. 4-5): 

At the short end of the window screen material, fold in 3 cm and fold over again (pic. 4). Use a bone folder to make the crease, if necessary. Secure with paperclips. Top stitch into place. Repeat at the other short end, but now making sure to incorporate the zippered pouch, nicely centered. Secure with paperclips. Top stitch into place (pic. 5).

2. Side seams (pic. 6): 

Fold the screen material in half, with the right sides facing. Close the side seams, 0.5cm from the edge. Next, bind side seams with fabric bias tape (pic. 6)

3. Boxed corners (pic. 7-8): 

Sew boxed corners.

Note: to avoid having to sew through too many layers you can pre-cut the boxed corners. If you prefer to play it safely, you can cut away the excess material after sewing the boxed corners.

If you wish to cut before sewing the boxed corners cut away a square with sides equal to the width of the panel divided by two, however don't forget to take into account seem allowance! (so if panel is 6cm wide, take off a square with sides equal to 5cm)
4. Bag bottom stabilizer (pic. 9): 


Make an oil cloth cover for the plastic bag bottom stabilizer, by sewing two pieces of oil cloth together, the size of the board + 1cm of seam allowance on all sides, leaving one of the short ends open. Turn over, insert the board.

5. Attaching bag bottom stabilizer to bag (pic.10):

Align the open end with one of the boxed corners as shown in pic. 10. Sew together. Bind seams with fabric bias tape. Bind the other boxed corner.
Note: the plastic board is attached to bag on one side only!
Mesh Beach Bag

6. Attaching handles (pic.  11):
Determine where the handles need to come. Punch holes correspondingly, in both the bag and the handles. Attach with rivets.
Note: As the size of the rivets never will perfectly match the thickness of the materials used, compensate the difference by using a small piece of leather or other material in the back. This will also add extra strength to the materials used.

And that's it!!

I'm wishing you a happy Summer...
Mesh Beach Bag


Please note, this tutorial is intended for personal use only. Therefore, do not reproduce, sell or commercialize in any form. Thanks for understanding!

If you made something using a tutorial found on this blog or if you got inspired by something you found here, make sure to post your pictures here.
January 23, 2012

Repurposing an old pair of jeans :: a DIY

Repurposing an old pair of jeans :: a DIY


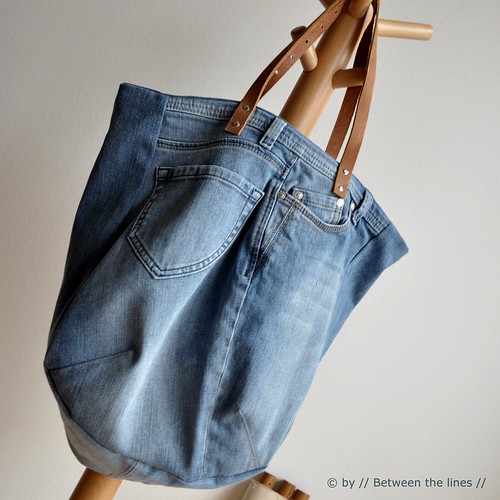
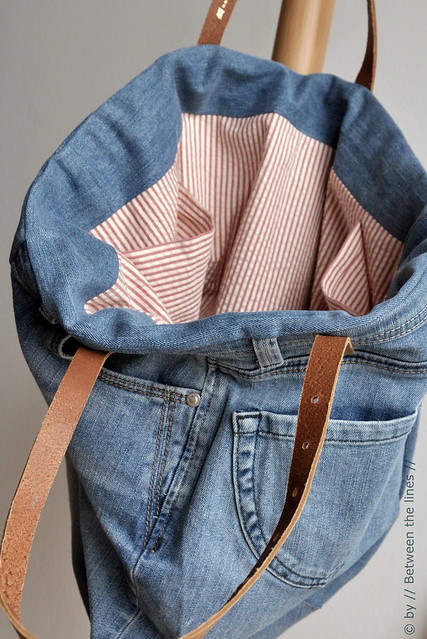
Yesterday, I felt like sewing a new bag. Only problem: I didn't have any of my favorite oatmeal colored linen left. It took me some rummaging through my stash to come up with something else: an old pair of jeans. We like a little challenge once in awhile!

Since our last move, I keep a whole stash of jeans in a box in my crafts cabinet. Originally, the idea was to keep the jeans until I had enough for making a quilt. However, with one quilt still waiting for the binding to get finished and the quilting as well, I must admit I'm not much of a quilter. Not when it comes to the bigger projects, anyway. Too intimidating, I'm afraid....

Anyway, since that quilt probably never is going to happen, I figured I might as well cut one pair to pieces for another project without doing much harm. This particular pair was a high-rise (!) that never really felt comfortable - probably because of its high-rise but mainly because of its unreliable zipper. Very annoying, even with a long shirt!

 Repurposing an old pair of jeans :: a DIY

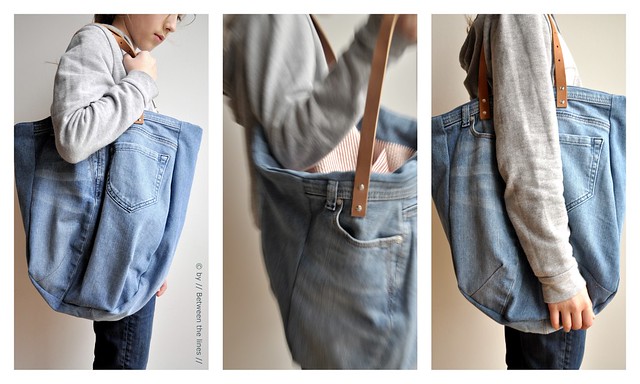
So, I cut the ugly thing to pieces and made this - not so ugly, if I may say so myself - tote.  I used the same bag pattern as for this one, this one and this one. Its shape basically comes down to a rounded slightly trapezoid rectangle with darts at the bottom corners, combined with a rectangular panel in between the front and back panel.
For the handles, I cut a cheap natural leather belt to pieces (H&M) which I still had lying around from when I was doing this tutorial. The lining is a left over from this project and this one as well. So basically, I didn't have to leave the house or spend another dime on this project, which is rather unique as usually there's always something missing. Not this time - instead, I got rid of something - a total win-win! How cool is that!

Repurposing an old pair of jeans :: a DIY


Now, in case you want to try this. Here are some notes on how I proceeded, which might be helpful.
  • cutting the jeans: I cut mine open from front to back to separate the two legs. Next, I cut each leg open along the inner leg seam, to obtain two flat pieces of fabric. I used the top part of each leg to cut the front panel and back panel, the front pockets and back pockets nicely centered. I was extremely careful not to cut the inner pockets to pieces while cutting each panel. That way all pockets are still fully operational! From the lower leg parts I cut the bag's middle panel (2 pieces joined together, about 15cm wide), as well as a strip for the facing of the bag (2 pieces joined together, about 7 cm wide). There was enough fabric left to make handles as well, but I decided to go with leather handles instead.
  • lining: originally, I intended not to line the bag, and finish the seams off with some bias tape. However, with all the seams already there, and the new ones and the inner pockets this would have looked rather unfinished, something I do not like. And I needed to hide the handles' rivets in some way or the other. So, I went for a lining instead. I'm not sure I chose the best way to do this, with a facing and lining, however. Because of the thickness of the fabric the top looks a bit bulky - it doesn't bother me, I own a bag from GAP with that same kind of bulky finishing, matter-of-factly, but it might bother the perfectionists amongst you. One might opt for a lining going all the way up, without the facing, and whip stitch it to the denim instead.
  • the handles: the main reason I went for leather handles is because I like the denim - natural leather combination and because I happened to have the right color of hardware (rivets) to go with it (sewing wasn't an option given the thickness of both the denim and the leather).  This is the first time I used this type of rivets. I didn't exactly have the right tools (no rivet gun) but I managed to get them in using pliers (a hammer didn't work and was too loud anyway - I did this past 10:00p.m. - not sure if the neighbors would have liked it). This is what I learned:
    • you'll hardly ever find the right size of rivets matching the thickness of leather and fabric. You can solve this problem by adding a small piece of leather (or fabric) in the back. Additionally, this will make it more sturdy as well as it reinforces the fabric of the bag.
    • prepare both the fabric and the leather by making the appropriate holes in them with a punch, corresponding to the rivet's parts (top part is wider than the bottom part) - this will reduce the effort needed to secure the rivet and makes sure you get them in at the exact right spot.
    • in order not to damage the rivets while using your pliers make sure to use at least a cloth in between. I found a piece of cork to be extremely helpful. Never put the pliers directly to the rivets!
 This being said, both my girls loved the bag. M. is desperate for another book bag for school and asked me if I could make another tote like this one... Please, mommy? Please?

I guess I'll have to take out that box one more time...  What else can I say to a sweet little request like that...?

Repurposing an old pair of jeans :: a DIY

January 13, 2012

Sewing pillows and some other stuff


It's been a weird week. Fast and slow at the same time.
Both girls had a 24hr bug, not on the same day, luckily. Both are fine now.
And then, I woke up with swollen and numb lips. They felt as if I had just been given an anesthetic - an allergic reaction to a new tooth paste I bought, it turns out. And I'm not the only one, apparently. Although from a good brand, this particular tooth paste has a pretty bad reputation when it comes to allergic reactions. Anyway, for a day or two I looked like someone with 'a Botox treatment gone totally wrong'. My lips are almost back to normal now, thank goodness, and I threw out the paste.

There was some sewing this week as well. I started making pillows. Lots of them. For the girls. For the living room. In an attempt to make our place a bit more colorful and cozy. As pillows are considered cozy here. We like to hang in the couch, bundled up with pillows and a blanket.


For the pillows I followed these instructions (in Dutch, but the pictures speak for themselves). I even made my own piping and got pretty good at it. After buying a special piping presser foot, that is. The invisible zipper foot didn't do the trick for me, the result being too irregular. But with the right foot it just looks perfect.


Did you actually know you can use old T-shirts or knit fabric to make piping? When I was about to start a pillow in my favorite Japanese fabric I realized I didn't have the right shade of fabric anymore to make the piping. Except for an old T-shirt of K. which was a perfect color match. So I decided to give it a try. I cut some strips - in bias, which strictly speaking is not necessary for knits - sewed them together and then made the piping.


It's hard to tell from the pictures, but I actually chose the wrong side of the fabric to be on the good side for the piping as the aspect of that came pretty close to the weave of the fabric I was using for the pillows. It worked like a charm. Thanks to the stretch of the knit, I got perfectly rounded corners at much less of an effort. Not only did this pillow turn out to be the best one I made so far, but I especially like it because it incorporates my favorite Japanese fabric and a recycled favorite shirt. Old and new, perfectly married.

I have a couple more pillows to go and maybe after that I could start on some curtains... or maybe not...
Oh, I so do not like making curtains...

Wishing you a wonderful weekend!

xo, P.


December 18, 2011

Handmade holidays :: a DIY wreath

Handmade holidays


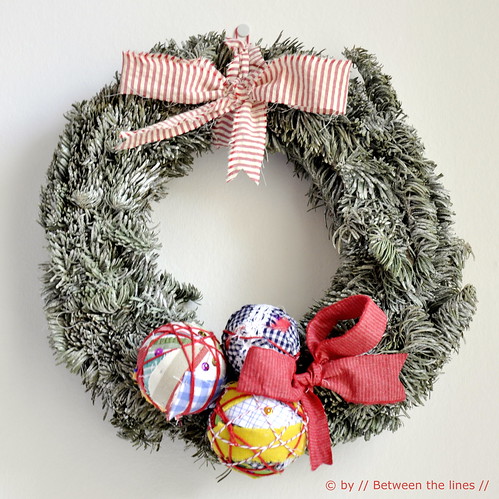
With only one more week to go before X-mas we felt we needed a little more deco around the house to get into the mood completely. The idea for the Christmas balls we got from the latest issue of Whip up's Action Pack. We made a whole bunch of them using fabric scraps, sequins, yarn, my favorite baker's twine and some lace we still had lying around. Three were used to decorate a (store-bought) wreath. The balls were attached using a hot glue gun. We tied two pieces of fabric scraps in a bow for the finishing touch and - Voilà!

Handmade holidays

July 22, 2011

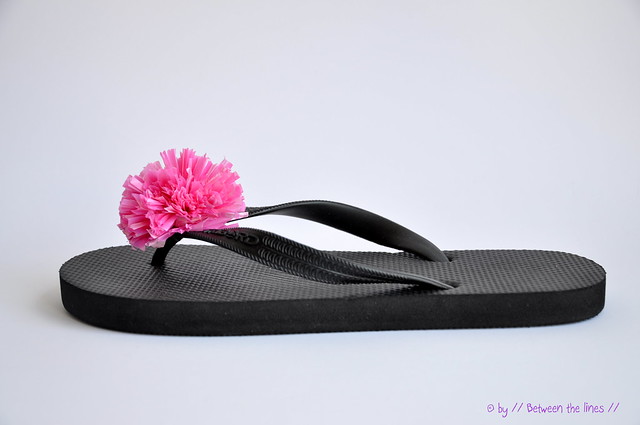
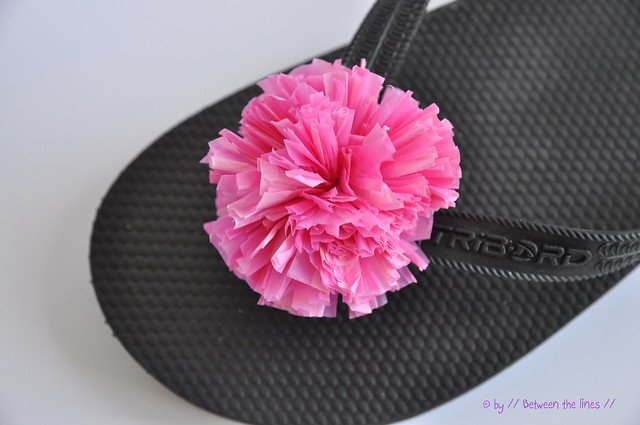
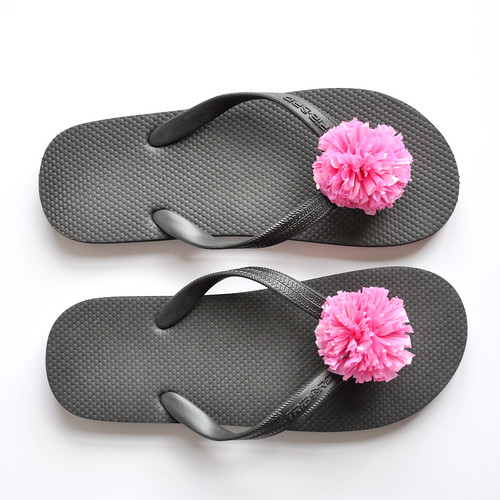
Recycled plastic bag pompom flip-flops :: a tutorial

(from the archives)


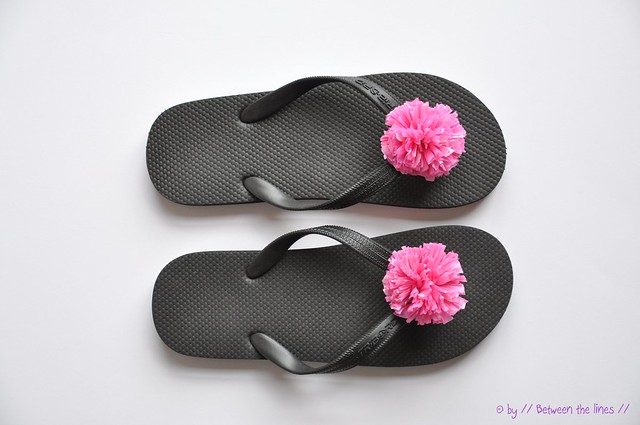
... or how to turn boring flip flop sandals into a pair of funky pompom slippers by recycling a couple of also boring plastic grocery bags. Summer is half way now, if you didn't get your flip-flops out yet, this is the right moment to do so!

This is a tutorial I wrote some time ago for the online magazine N.E.E.T (check out their June issue here and check here for back issues - the photography in this magazine is simply stunning as is the artwork, and they have a blog too).


I'm posting it again, here, for those of you who missed it and also because I think it's a fun recycling project which you might want to try making with the older child - if you are having summer vacation right now and if you are running out of ideas: Keep on reading!


What you’ll need:

Warning: Choking hazard! Small parts. These flip flops are not suited for young children!

-          A pair of plastic flip flop sandals
-          A couple of plastic grocery bags
-          A piece of card board
-          Pencil
-          Scissors
-          Needle and thread
-          A glass and a coin or a compass


plastic bag flower slippers


Instructions:

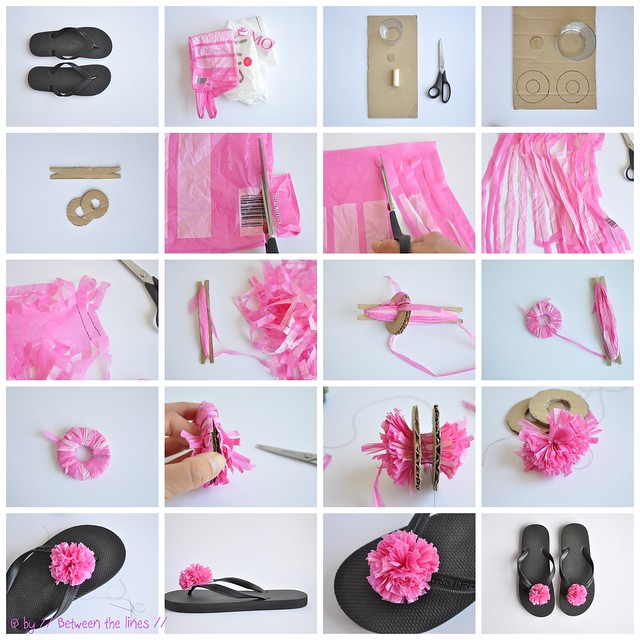
1.        Pompom template:  Make two card board doughnut shaped circles using the glass and coin for tracing. Cut out both circles; next cut out the center. 

2.       Card board spool:  Cut a rectangular piece of card board, the width being slightly less than the diameter of the smallest circle – make a triangular incision at both ends.

3.       Plastic bag string:
a.       Place the plastic bag in front of you, flat. Cut off the bottom seam of the bag and unfold the inner folds. Place the bag which is still tubular flat in front of you.
b.      Start cutting strips going from one fold to the other but leaving a one inch allowance at the top fold. Repeat this over the entire width of the bag until you reach the handles. Cut off handles.
c.       Now, unfold the allowance and slip the bag over your hand with the allowance facing up.  Now, start making slant incisions from strip 1 to strip 2, strip 2 to 3 etc. You’ll get one long strip of plastic bag string.
d.      Wind the plastic bag string around the cardboard spool you made.

4.       Plastic bag pompoms:
a.       Place both pompom templates on top of each other. Using the spool wind the string around the pompom template.  Make sure to cover the entire template. The more string you wrap around the template the fuller the pompom.
b.      When finished, carefully cut open at the top between circles. Carefully separate the circles slightly so you can wind some thread firmly around the strips. Tie a few knots. Don’t cut off the loose ends.
c.       Carefully, slip off the template.  If necessary trim the pompom to give it a nice shape.

5.       Assembling: Place the pompom on top of the strap of your flip flop. Slip the loose ends of the thread through a needle. Now wrap the thread around the strap and, pass the needle through the center of the pompom. Repeat a couple of times until the flower is firmly attached. Tie a firm knot; cut off and apply a dash of glue or transparent nail polish to the knot. Trim the pompom some more if necessary.  Repeat for the other foot and… Done!


Note: If you don't have enough bags of the same color ( you need approx.1 per pompom) use different colored bags and combine them on the spool.

Warning: Choking hazard! These flip flops are not suited for young children!

As with all of my tutorials, please note, this tutorial is intended for personal use only. Therefore, do not reproduce, sell or commercialize in any form without permission. Thanks for understanding!

June 2, 2011

This is so N.E.E.T.!!

How N.E.E.T. is that!


Not too long ago, I was contacted by Stephanie at N.E.E.T. magazine. If I would be interested in doing a tutorial for the June issue - preferably a recycling project, something for summer. Did I need to think about that? No, of course not!

So, here it is, the latest issue of N.E.E.T. magazine - with my recycled plastic bag pompom flip-flops among tons of other great stuff. Really, I feel so proud to have my project featured in a stunning and inspiring online magazine like N.E.E.T.! N.E.E.T. has great photography, styling, DIY projects, ... Go check it out!
And make sure to go take a look at page 148 through 151 for some really cool DIY flip-flops! There's even a downloadable PDF... Not to be missed!

May 18, 2011

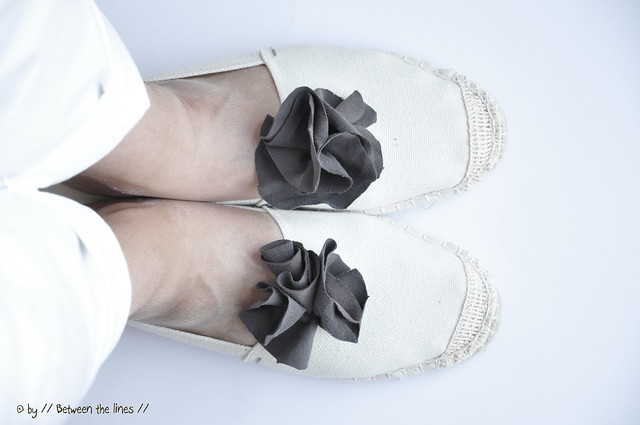
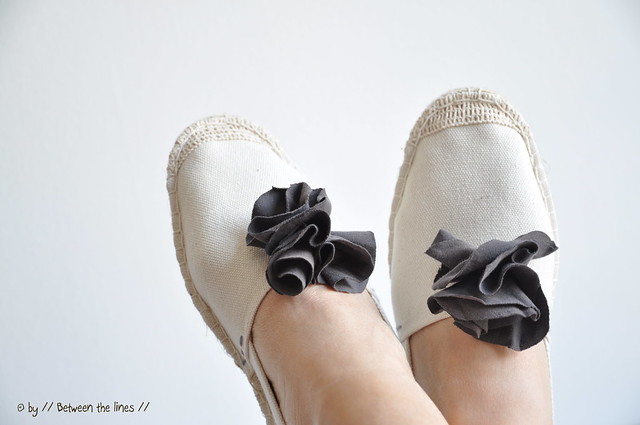
Creative with espadrilles :: a DIY

Creative with espadrilles :: a DIY

I have this love hate relationship with espadrilles. I always loved them because they stand for summer. Whenever they show up you know summer's around the corner. Summer. Sun. The beach. No stress. I also love them because of their simplicity. A shoe can't get any simpler (nor cheaper) than that, can it? A sole and two pieces of fabric joined together.

However, I didn't wear espadrilles for the longest time because of the squeaky sound the rope of my last pair made. Just thinking of it gives me the shivers! So, what made me buy another pair and devote a whole post to them? To be honest I have no idea - I must admit I fell for the gray stitches on the sides, but was that enough to buy them, bearing the squeaky sound of the rope in mind? I guess I just needed another challenge: the espadrille make-over.

I actually had a lot of fun working on this DIY. As a matter of fact, what you see here is only a fraction of the things I came up with. There might be a couple more ideas in the pipeline...
Anyway, let's just start with this handful of ideas. Ready?

What you'll need:

- a pair of espadrilles
- an old T-shirt or other fabric scraps, if you like
- a pair of scissors
- needle and thread

Instructions:

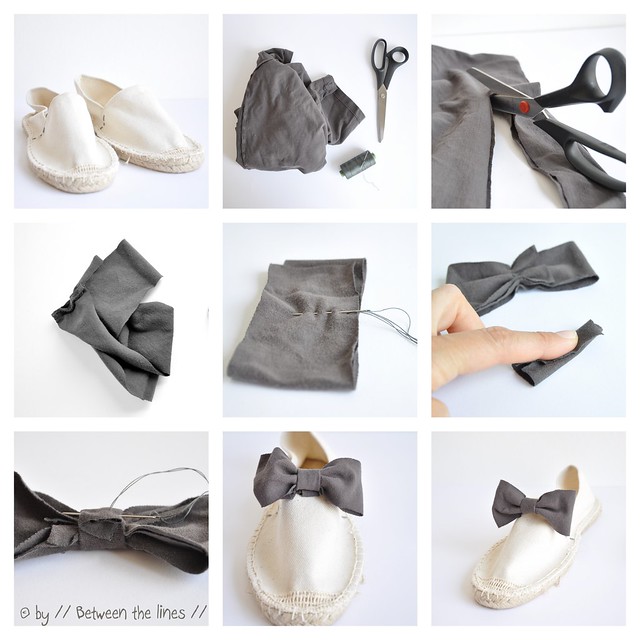
Bow-tie espadrilles

Creative with espadrilles :: a DIY

1. Cut a strip from the old T-shirt, about 3-4cm wide and 20cm long.

2. Fold over the strip so the fabric overlaps. With needle and thread, in the middle, gather and secure the fabric. Cut of excess fabric, if any.

3. Fold a small piece of fabric over the stitches, to hide, and secure with a few stitches on the back. Shape the bow tie.

4. Position the bow-tie onto the espadrille and secure with a couple of stitches.

5. Repeat for the other shoe. Wear!


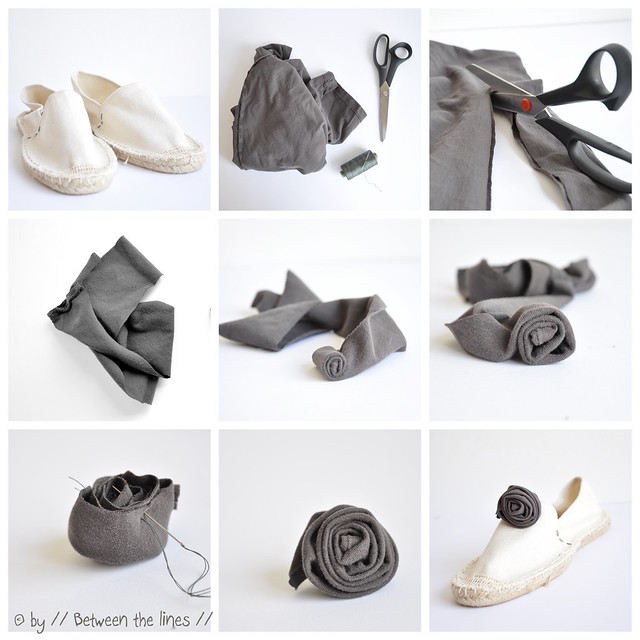
Rose bud espadrilles

Creative with espadrilles :: a DIY

1. Cut a strip of t-shirt.

2. Fold in half and start rolling the fabric to form a rose.

3. Secure at the bottom of the flower with a couple of stitches. Shape.

4. Position onto the shoe. Sew into place with a couple of stitches.

Note: the size of the flower depends on the width and length of the fabric. You can play around with both. Or why not make several flowers different in size and color to form a rose garden on your shoe!


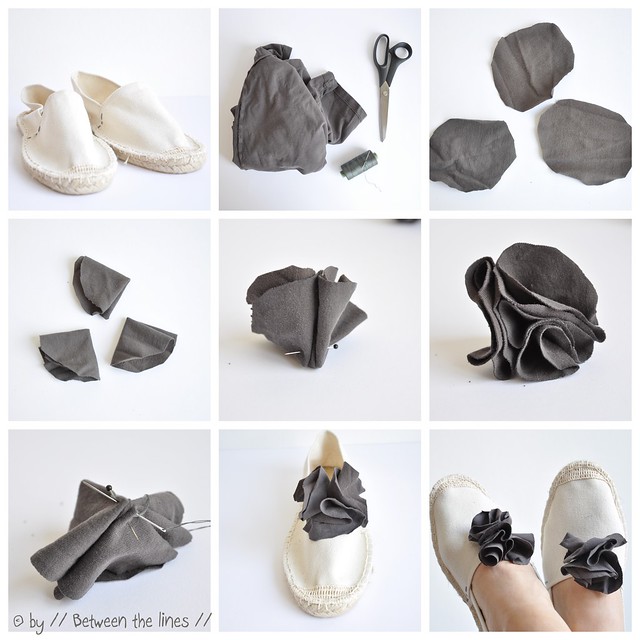
Flower petals espadrille


Creative with espadrilles :: a DIY

1. Cut three (or more) not so round circles of roughly the same size.

2. Fold them in half and again in half and place all three on top of each other. Pin together.

3. Next, sew them together with a couple of stitches and shape the flower as you go.

4. Place on top of your shoe. Sew into place with a couple of stitches.

Note: Same thing applies here: play with size and color or combine several to form a flower patch on your shoe. Add sequins, beads, leaves, ... if you wish so, or just keep it simple.

Creative with espadrilles :: a 
DIY 

This is a fairly easy craft, which kids could easily do. It's not very time consuming, no special supplies are required and the reward is immediate.
Maybe a fun craft idea for a summer birthday party!? If you can't find espadrilles right away, gym shoes might work just as well, just as any other ballerina or pair of flats.

My espadrilles have been extensively tested by now. And you know what? This pair doesn't squeak!

Creative with espadrilles :: a DIY

Please note, this tutorial is intended for personal use only. Therefore, do not reproduce, sell or commercialize in any form. Thanks for understanding!

If you made something using a tutorial found on this blog or if you got inspired by something you found here, make sure to post your pictures here.
May 3, 2011

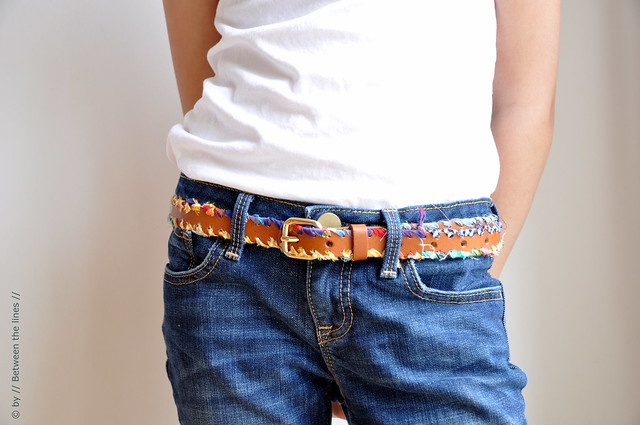
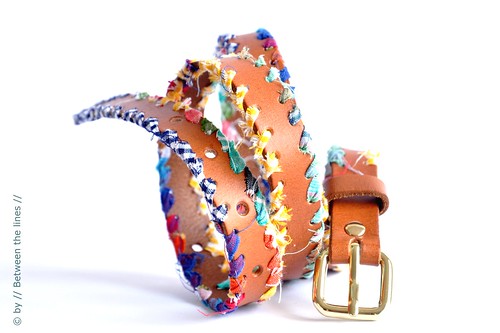
Bohemian style belt :: a tutorial

Bohemian style belt :: a tutorial

Have you noticed? This summer, it's all about belts. Belts are quick fixes to any outfit, be it chic or casual. This summer, they come in different styles, widths, textures, and colors... I particularly like tiny belts - they add elegance to any silhouette (read: suggest the presence of a waist, even if there ain't any...LOL).

I don't quite remember what exactly triggered this project - was it my new leather punch? - but I had it in mind for quite a while - I just hadn't found the time yet to work it out. But I did now! Hurray to all the cartons unpacked!!

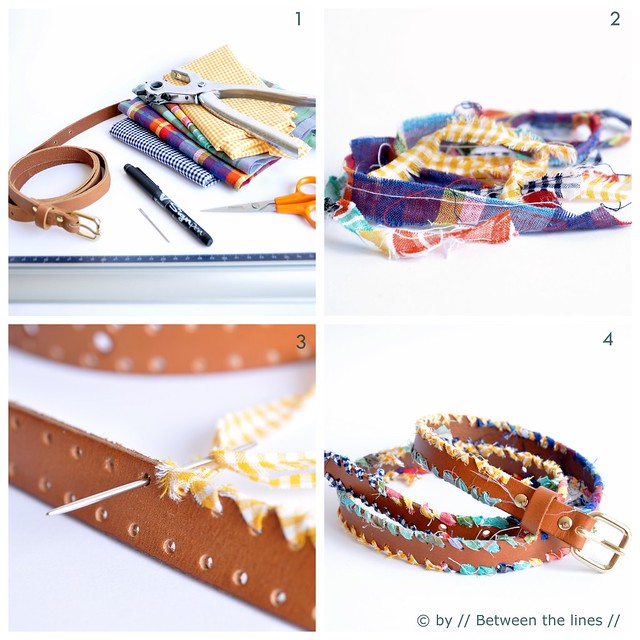
As always, this is a very easy project, which requires very basic sewing skills only. Also, very little is needed. Except for a free hour or so you'll need:

- an old leather belt, or a cheap new one
- fabric scraps, ribbon or bias tape,...
- a leather punch
- scissors
- big needle
- ruler and marker

Bohemian style belt :: a tutorial


Preparing the fabric:

From your fabric scraps, cut strips of different lengths. I cut mine about 1cm wide. No need to cut in bias - we like the frayed look on this project! I didn't measure the exact length the strips totaled up to, but my guess is you'll need about three times the length of your belt. If you're not sure, cut as you go.

Preparing the belt:

1. Determine how far apart you want the holes. I used 1cm intervals. Starting from the buckle, with a felt tip, make a mark every centimeter, about 0.5cm from the side. Do this all the way around the belt.

2. On your leather punch, determine which size of holes you want (use a piece of scrap leather or card board to test the sizes, before you start on the belt - the holes need to be big enough to fit the fabric strips through). Now, punch your way around the belt. This is the most and only labor intensive part of this craft, I promise!

Assembling:

1. Thread a big needle with the first fabric strip, tie a knot at the other end. Sew your way around the belt with a whip stitch through the holes. Change fabric strips as you go and to your liking. Don't worry about the lose ends - we will take care of those later - just start with a new strip in the next hole as you change.

2. Weave in the loose ends at the back of the belt, by slipping the needle under a couple of stitches. Cut off what's left. Repeat for every loose end and ...

Done!!
A bohemian style leather belt to give that white shirt and jeans outfit a little color boost!

Bohemian style belt

Notes:

- If you don't have a leather punch, you can find them at most hardware stores, where they'll likely be cheaper than at specialty stores or craft stores.
- Instead of using fabric strips, one could also use different strands of embroidery floss of several colors combined together, leather shoe laces, raffia, ...
- I combined different types of fabric, but of course you could limit yourself to the use of a single color - in that case just cut your strips as long as possible.

Please note, this tutorial is intended for personal use only. Therefore, do not reproduce, sell or commercialize in any form. Thanks for understanding!

If you made something using a tutorial found on this blog or if you got inspired by something you found here, make sure to post your pictures here.
Related Posts with Thumbnails