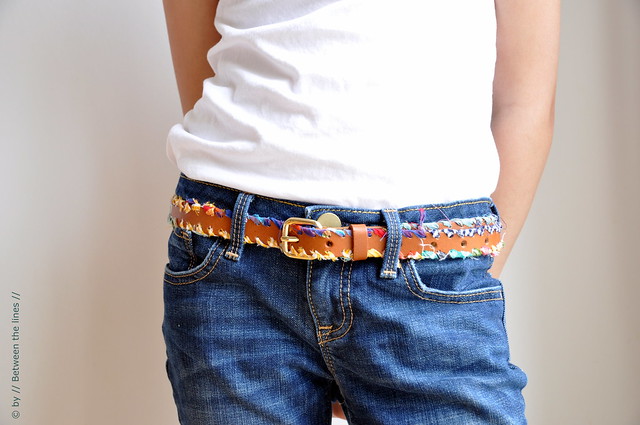
Have you noticed? This summer, it's all about belts. Belts are quick fixes to any outfit, be it chic or casual. This summer, they come in different styles, widths, textures, and colors... I particularly like tiny belts - they add elegance to any silhouette (read: suggest the presence of a waist, even if there ain't any...LOL).
I don't quite remember what exactly triggered this project - was it my new leather punch? - but I had it in mind for quite a while - I just hadn't found the time yet to work it out. But I did now! Hurray to all the cartons unpacked!!
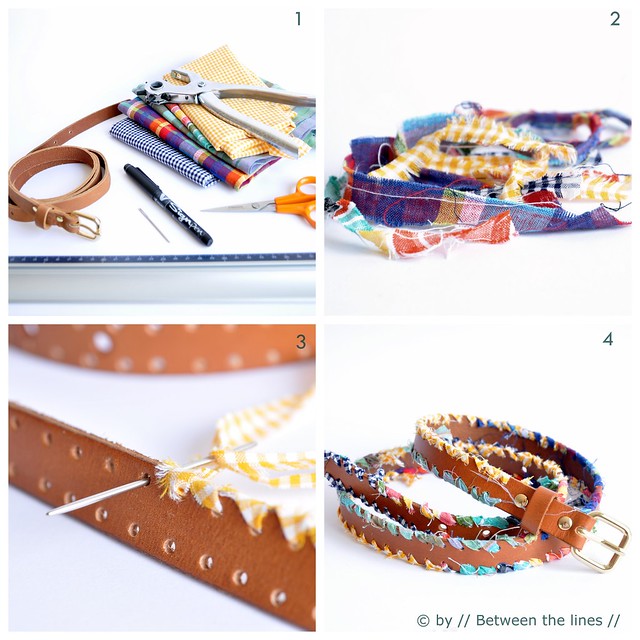
As always, this is a very easy project, which requires very basic sewing skills only. Also, very little is needed. Except for a free hour or so you'll need:
- an old leather belt, or a cheap new one
- fabric scraps, ribbon or bias tape,...
- a leather punch
- scissors
- big needle
- ruler and marker
Preparing the fabric:
From your fabric scraps, cut strips of different lengths. I cut mine about 1cm wide. No need to cut in bias - we like the frayed look on this project! I didn't measure the exact length the strips totaled up to, but my guess is you'll need about three times the length of your belt. If you're not sure, cut as you go.
Preparing the belt:
1. Determine how far apart you want the holes. I used 1cm intervals. Starting from the buckle, with a felt tip, make a mark every centimeter, about 0.5cm from the side. Do this all the way around the belt.
2. On your leather punch, determine which size of holes you want (use a piece of scrap leather or card board to test the sizes, before you start on the belt - the holes need to be big enough to fit the fabric strips through). Now, punch your way around the belt. This is the most and only labor intensive part of this craft, I promise!
Assembling:
1. Thread a big needle with the first fabric strip, tie a knot at the other end. Sew your way around the belt with a whip stitch through the holes. Change fabric strips as you go and to your liking. Don't worry about the lose ends - we will take care of those later - just start with a new strip in the next hole as you change.
2. Weave in the loose ends at the back of the belt, by slipping the needle under a couple of stitches. Cut off what's left. Repeat for every loose end and ...
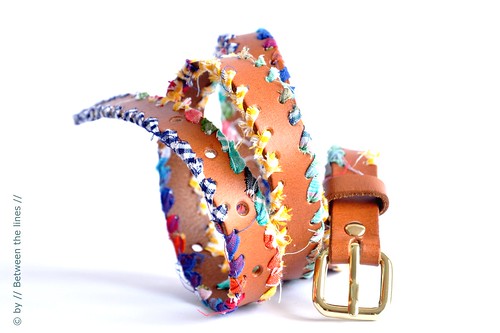
Done!!
A bohemian style leather belt to give that white shirt and jeans outfit a little color boost!
Notes:
- If you don't have a leather punch, you can find them at most hardware stores, where they'll likely be cheaper than at specialty stores or craft stores.
- Instead of using fabric strips, one could also use different strands of embroidery floss of several colors combined together, leather shoe laces, raffia, ...
- I combined different types of fabric, but of course you could limit yourself to the use of a single color - in that case just cut your strips as long as possible.
Please note, this tutorial is intended for personal use only. Therefore, do not reproduce, sell or commercialize in any form. Thanks for understanding!
If you made something using a tutorial found on this blog or if you got inspired by something you found here, make sure to post your pictures here.

