The week hasn't exactly been going as planned but things seem to have calmed down now. I hope. I didn't forget about the promise I made earlier this week - the only problem was finding half an hour to get my act together (and half an hour of good light as well). And I did today!
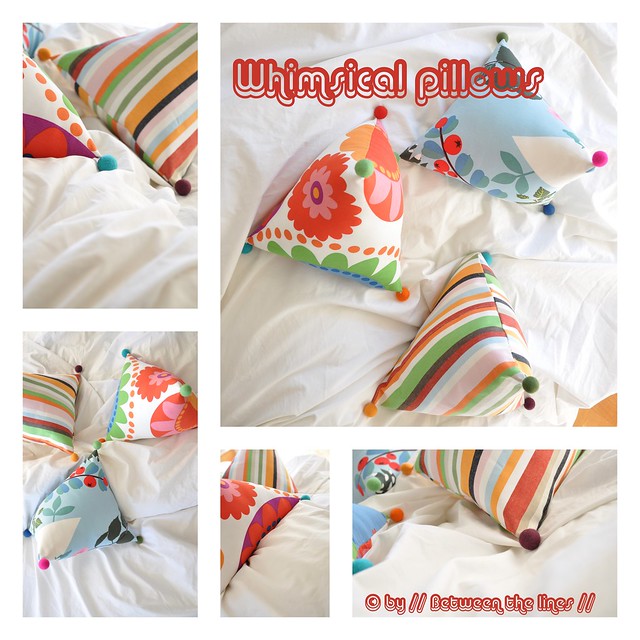
So, here's our most fantastic pillow ever! My girls' very favorite (and mine as well) totally whimsical triangular shaped pillow (this is actually the simpler version of a pillow I made a little while back but which didn't make it to the blog yet, somehow). It's absolutely fun to make and more importantly, it's absolutely easy to make. A perfect beginner's sewing craft. As a matter of fact we each made one. Little H. made the blue with mountain scenery one, big girl M. made the flowered one and I did the striped one. All three fabrics are from IKEA. The felt balls I still had here at home (no, Michelle, we didn't make them, though given all the roving I still have I might give it a try!). So, if you're still looking for a fun handmade present or for something to keep the kids busy during the holidays, keep on reading! All it takes is three seams and some stuffing!
What you'll need:
- fabric: a 32cm x 64cm piece of heavy cotton, denim, canvas,... (seam allowance included)
- 4 felt beads in assorting colors - pompoms would be nice too, by the way!
- poly-fiber fill to stuff the pillow
- sewing machine
- needle and thread
- scissors
Note: you can make the bigger or smaller, just make sure that the long side of the rectangle is twice the short side in length.
Instructions:
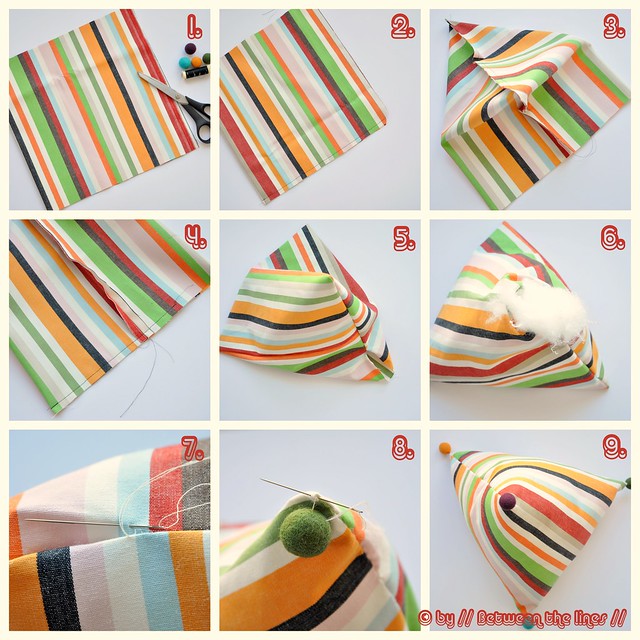
1. Fold the rectangle in half, right sides facing. Close two of the three open sides using a 1cm seam allowance and clip the corner as shown in picture 2.
2. Open up the remaining side and fold as shown in picture 3., i.e. fold the pillow cover such that the seam from step 2, ends up exactly in the middle of the remaining open side (so you will have 15cm of fabric on either side of the seam from step2). Pin and close that side, leaving an opening big enough for turning and stuffing (picture 4.).
3. Turn the cover inside out and shape (corners!). You'll get something that looks as shown in picture 5.
4. Stuff your pillow with the fiber fill to your liking, making sure the stuffing gets well distributed (picture 6).
5. Close the gap with a couple of stitches (picture 7).
6. Sew on the felt beads, one at every tip of the pillow (picture 8). And that's all there is to it (picture 9)!
Make sure to make enough of these for a pillow fight!!
Please note, this tutorial is intended for personal use only. Therefore, do not reproduce, sell or commercialize in any form. Thanks for understanding!
If you made something using a tutorial found on this blog or if you got inspired by something you found here, make sure to post your pictures here.

