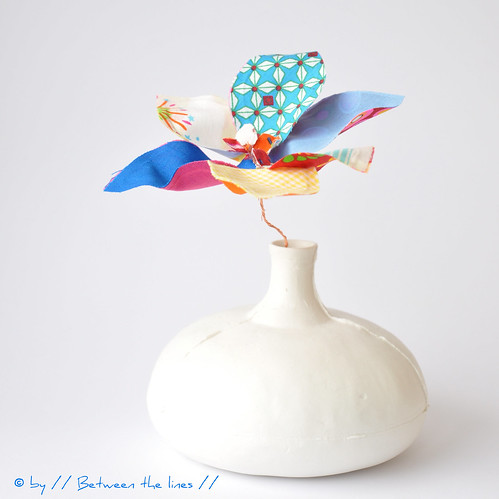
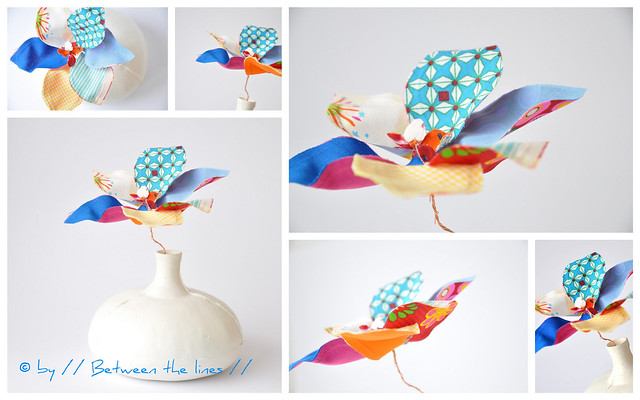
Though this morning didn't feel like Spring - I was cold the entire trip to school and still am, despite the polar fleece I'm wearing now and the cup of hot coffee I had - we certainly were lucky with the weather lately. Sun! I just love the light the early Spring sun brings! It makes me happy, excited. And it shows in my projects, I believe. Take this fabric and wire flower, for instance. Don't you think it's over the (my) top colorwise?!
It started with one of those kits to make flowers with wire and some colored gooey liquid (I actually think it's white glue mixed with colorants of some sort) which little H. received from a friend for her birthday. While I was helping her out I just started wondering if maybe I could do something similar with fabric and wire. With Vliesofix that shouldn't be too difficult, I figured - no, I'm not affiliated with Vliesofix, but just happen to have bought a lot of the stuff. So, after buying the Petit Pan scrap bag, everything came together and I made my flower. You've no idea how little time these flowers take to make. It's free style from beginning till end, which I love. I don't like wasting precious time on making patterns, and elaborate preparations before being able to actually do something. In that respect I'm not any different from the average kid - I want instant gratification... (when little H. read on the box she had to wait for at least 12 hours for the gooey stuff to dry and set, she was really disappointed "but it looks dry to me - do I really have to wait untill tomorrow, mommy?").
So, if you want to give that Spring feeling a boost or just want to hold on to that last bit of summer, just keep on reading as here are some instructions!
What you'll need:
- scraps of fabric
- wire, not too thick
- Vliesofix, Bondaweb, ...
- scissors or cutting pliers
- iron
Instructions
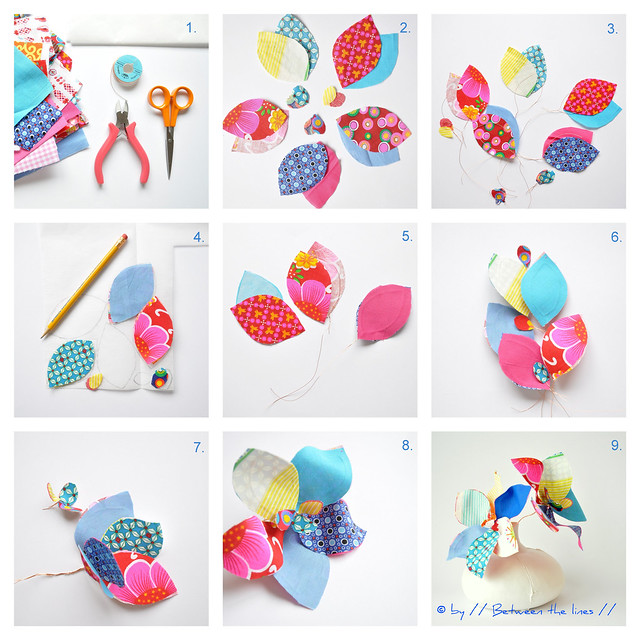
- Determine how many flower petals you want. Cut your petals, freestyle, in pairs, i.e. cut at once front and back of the same petal by layering your fabric such that wrong sides are facing. Repeat until you have the desired number of petals.
- Trace every pair of petals onto the paper backing of the Vliesofix and cut out.
- Cut wire to length - you'll need one piece of wire per petal. Bend and twist the wire to form a petal shape, using the fabric petals as a guide for size - make the wire petal slightly smaller than the fabric petal.
- Iron Vliesofix onto the wrong side of its corresponding petal. Let cool down. Peel off the paper backing. Position the wire petal shape on top. Next, place the other petal piece on top, sandwiching the wire in between petal layers. Fuse the petal layers and wire together with your iron. Let cool down. Repeat for every set.
- Arrange your petals to form a flower. When happy, twist the wires together to form a stem. Note: depending on the gauge of the wire you're using and on what you intend to use the flower for, you might want to twist the wire around a stick or another more heavy wire for support.
- Once you're done twisting you can start playing with the petals - the most fun part, I think - to shape your flower.
Enjoy!
After I made this flower, I found a similar project in the last issue of Marie Claire Idées. Instead of Vliesofix they use glue, which is slightly more messy, if you ask me...
Please note, these tutorials are intended for personal use only. Therefore, do not reproduce, sell or commercialize in any form without permission. Thanks for understanding!
If you made something using a tutorial found on this blog or if you got inspired by something you found here, make sure to post your pictures here.

