
In case you were wondering, yes, that's me in those pictures. I had an extremely kind, patient and talented photographer - my big girl M.!
With both of my girls having a poncho now (well almost - I'm about to finish little H's one) I couldn't stay behind, right? I've always had something with "wraps". I have several and especially like them at this time of the year. They're incredibly cozy, but not always handy, I admit - they tend to unwrap easily and get in the way. Not so with a poncho, I figured.
Now, on several occasions I've seen women wearing this kind of poncho here which I really liked - a very simple, minimalistic yet elegant interpretation of the classic poncho, with only one seam apparently. With three meters of knit fabric, I thought, I might as well give it a try. And I'm glad I did!
Barely a couple of days old, it's already become a favorite! I wear it on top of a light sweater or long sleeved shirt, with jeans and boots. And it looks great, I must say. Casual-chic. The perfect outfit for a nice autumn day (well, any day really). Since I used a not too heavy knit fabric, there's a nice natural drape to it as well.
As it's really super easy to make I decided I wanted to share this project. If it weren't for the step-by-step photos I probably would have finished it in under half an hour! Also, while making the poncho I figured out a new and very satisfactory way of finishing corners. I'm probably reinventing the wheel here - if so, please, forgive me - but it worked out really nicely, so I definitely will use that technique again!
Ready to get started?
Instructions for an 100% easy single seam poncho:
What you'll need:
- 78cm of knitted fabric (150cm wide) or any other fabric with a nice drape
- matching thread
- pins and sewing needle
- sewing machine equipped with a ballpoint needle when using knit fabric
- iron
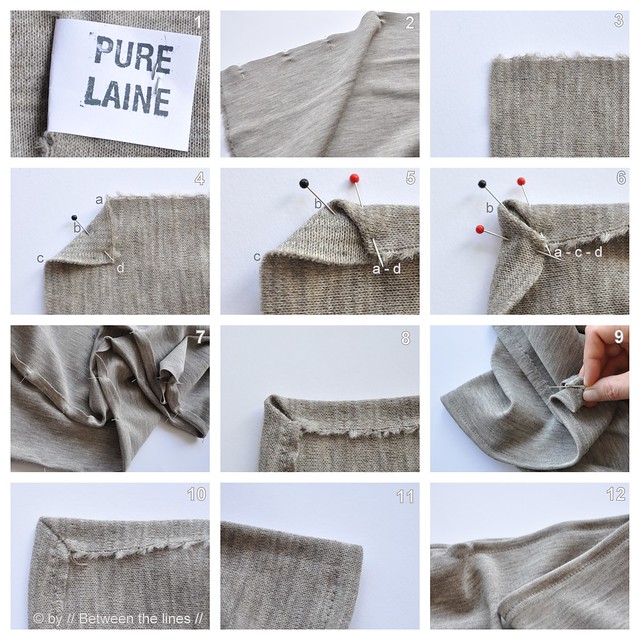

- Fold your fabric as shown in the above diagram.
- Shoulder seam: Pin one of the open sides together as shown in the diagram, leaving a 30cm opening to start from the fabric fold, for the neck. Sew on the machine.
- Corners and hem: At the wrong side of the fabric, fold in the corner as shown in pic. 4, so you get the acd triangle and use a pin to secure. Next, fold the end ab such that a and d coincide, and do the same with the end bc to let c coincide with d as shown in pic 5-6. Secure with pins. You'll get a corner which looks as shown in pic 6. Continue to pin the hem all the way around. Next, sew on the machine. The two corners will look as shown in pic 8. With needle and thread close the little opening between b and acd, using a whip stitch (pic 9). The finished corners now should look as in pic 10 (wrong side of the poncho) and 11 (right side of the poncho).
- Neck line: fold in the fabric at the neck line, pin with needles to secure and top stitch on the sewing machine (pic 12).
- Press all seams flat and your poncho's ready to wear!
I'm planning on making a couple more of these when I come across the right fabric. One of the things I'd like to try is to make one in a light weight fabric, gauze cotton, or maybe silk, for summer.
I think that actually might look nice on top of a pair of jeans and a tank top, don't you think... ? To be continued, I'm sure...
And now I have to find something to make with the remaining 2m22 of fabric left...
Please note, this tutorial is intended for personal use only. Therefore, do not reproduce, sell or commercialize in any form. Thanks for understanding!
If you made something using a tutorial found on this blog or if you got inspired by something you found here, make sure to post your pictures here.

