I mentioned this project a while ago and I also said I wouldn't disclose until after Valentine's day. Well, I changed my mind as I'm too excited about this one. I really like the way it came out! It's one of my favorite projects, so far. I keep my fingers crossed M. won't read my blog in the coming days...
I got the idea for this one on "one of my walks through Paris" (you've heard that line before), when I ended up at the boutique "Les Fleurs" -- they've got some really nice stuff there, though a little expensive in my opinion -- where I spotted these lucky charm dolls. Somehow, these stuck to my mind and then I came up with this "gri-gri"-idea. These are the kind of things that keep me from falling asleep at night or going to bed at a decent time... but this totally aside.
This is how I made it:
I used:
- a small piece of light colored fabric for the front - it needs to be light colored in order for the transfer to work
- another small piece of fabric for the back (did you recognize my backing fabric? - it's the same one as I used here)
- a clasp or key-chain ring
- a photograph to transfer onto the fabric
- iron-on transferring paper (freezer paper might work too I guess, though I have no experience using it as I can't find it around here)
- markers, pencils, crayons, soft pastels...
- needle and thread or sewing machine
- a photo-copier-printer
- a small amount of fiber fill
- a little piece of ribbon (mine is blue-ish velvet)
for the decorations (optional):
- a small end of narrow ribbon (I used embroidery silk ribbon), or anything else that might work to attach the decorations to - use your imagination
- a large bead (mine is crocheted, but you could use a felted bead as well, glass beads,.. again, that's totally up to your own taste and liking)
- a glass bead
- a little heart-shaped charm
- two headpins and jewelry making pliers
That may seem a lot of things, but it isn't, really. I had everything here except for the clasp and the crocheted bead.
For the first and most important step: choose a picture. This could be anything. Just make sure it has a good resolution. I chose a color photograph and changed it to sepia. I did this because I wanted the final picture to have a vintage look and I wanted to color it in. I've tried both, sepia and B&W, but sepia seemed to work best in my case. Print your picture, bigger than you intend to have it transferred later on. I used 8x10. This allows you to color it in more easily, as that's the next thing you'll need to do. So, take your markers and start to color in the accents you want to show up (I did mouth, hair and the details of the dress in marker, the cheeks with soft pastel.) This step is critical and a bit trial and error. When you're satisfied with the result, copy the picture, but this time reduced to the size you want to end up with on the gri-gri. You might have to repeat the coloring step a couple of times (if you don't want to waste too much paper and ink, print on the back of the paper and use a low print quality setting - this should be OK, except for your final print out). When happy with the result, cut out the outlines of the picture and next copy again, but to a white background this time. Check again for the result. Next, print onto some iron-on transfer paper. A little note here: if your picture has words or letters in it, don't forget to print in mirror-view (this is an option available on most printers these days). Cut out along the edges of your object. When done, take a deep breath as you've just finished the hardest part of this project!
Next, take the light colored fabric and iron-on the transfer you've just printed (read the instructions on the package for the right temperature settings and time needed!). Cut out the desired shape, taking into account a margin for sewing. Do the same with the fabric for the backing.
Time to start sewing, now. Put the pieces together as shown in the diagram below, the right sides of the fabric facing, and the loop with clasp sandwiched in between. The reason I have the clasp sewn in that way is because it didn't come with an opening to slide on the loop after assembling - unfortunately, I found this out the hard way... If you're using a regular key-chain ring you can leave it out while assembling and slide it on after. You can do the sewing either by hand or on the sewing machine. I used the sewing machine as it's faster. Also, I stitched back and forth a couple of times at the level of the loop to secure. Make sure to leave an opening at the bottom so you can turn inside out the gri-gri. If your piece is curvy, make sure to make little cuts perpendicularly to the stitches on the curvy parts.

Now, fill up with the fiber filling. Whip stitch the bottom closed.
We're almost done!

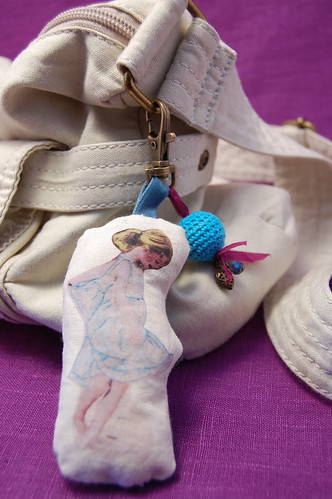
Now, comes the decoration, which is totally optional and up to your imagination. I used a crocheted bead, a glass bead and heart-shaped (Valentine's day!) charm.
If you don't know how to make a wire-wrap loop using headpins and pliers check here for a tutorial.
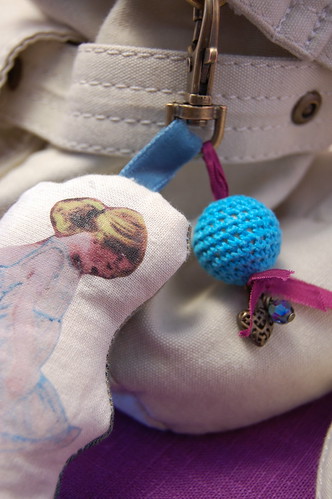
Tie, slide or loop the decoration around, on or through the key-chain ring.
Et voila! A gri-gri!
For the photographs, I borrowed M.'s little purse so you can see what it looks like when attached.
I'd better go check if I took it back off again...!!

A little note on the photograph I used for this project. The original picture was taken by the photographer Nancy Trapp-Chen, a couple of weeks before we moved from California to France. The pictures she made not only represent a nice memory of our life in California, but have been a great source of inspiration to me, as well. I've incorporated them in some of my favorite crafts... Thanks, Nancy!

