Last Thursday, I mentioned I would write down a tutorial for the message board I made for M.'s birthday. Well, I decided not to procrastinate on this one - better to write it down while it's still fresh in my mind.
So, here is part one: getting the fabric ready - if you want to paint your own design, that is.
You will need:
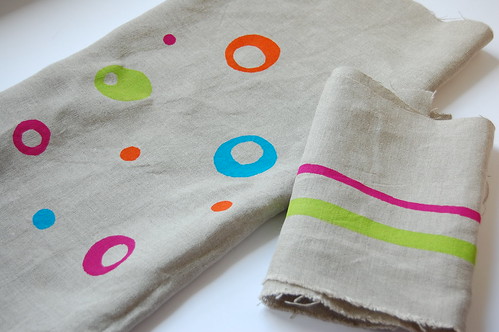
- a piece of fabric, slightly bigger than the message board you want to cover (read step 1 before cutting the fabric, though). In my case, the message board measured 40cm x 60cm, so I added 10cm on all four sides. Though this might seem like wasting a lot of fabric, you'll notice this will make things a lot easier near the end when you have to pull and stretch the fabric around the board.
- if you intend on making pockets the way I did, you'll need another strip of fabric of about 20-25cm x 60cm (change the dimensions according to the size of your board and depending on the orientation of the board)
- fabric paint
- stenciling brushes
- freezer paper or stencils
- painter's tape
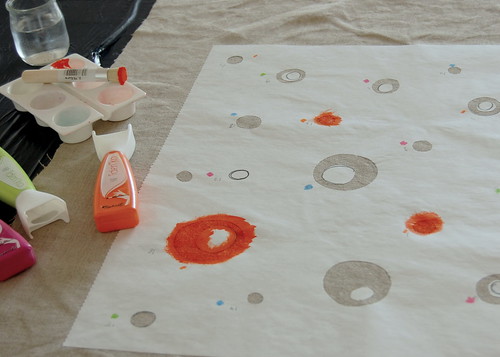
- small recipients for the paint (one for every color)
- water and a cloth, just in case
- something to protect your working surface (I usually cut open a big size plastic trash bag for this purpose)
1. Wash the fabric - very annoying if you're of the impatient type like me, but a very important step. I did this before cutting my fabric, to avoid having to deal with shrinkage... It's very important you wash the fabric if you want to get the best results out of your paint. You need to get rid of all the residue from the production process still in the fabric and of any loose fibers. This will allow for the paint to adhere well to the fabric and to get absorbed. I used linen for my message board, and I can tell you there sure was a lot of loose fiber in there, telling from cleaning the filter of the dryer afterward. The fabric also felt much softer (do not use fabric softener, however!).
After washing, let the fabric dry (line dry or dryer - depending on how patient you are) and next iron it - you don't want any wrinkles! And finally, cut your fabric to size, if you didn't do so already.
2: Design your stencil. Since you have to wait anyway for the fabric in the washer/dryer to be ready, you can start on your design. I made a rough sketch on a piece of paper first. Transfer you design onto the freezer paper, which you cut to the size of your message board. If you don't want to waste your precious - and here, hard to find - freezer paper you can work with smaller pieces (but make sure you leave a big enough margin around your design to avoid unwanted spilling onto the fabric). In this case, however, use painter's tape to outline the size of your message board on the fabric. I'm an absolute beginner in terms of fabric design, so I kept the design really simple: ovals and circles. When out of inspiration for a design, I highly recommend Lotta Jansdotter's book, where you can not only find fun projects, but also some really cool yet simple designs in the back. When happy with your design cut out your shapes.
3. Iron the freezer paper onto the washed, dried and ironed fabric. Make sure the freezer paper adheres well at the edges of your design as you don't want the paint to leak underneath. This is exactly what happened with the striped fabric. For that one, I used Scotch-Blue painter's tape, which wasn't the best choice for this purpose (but it has proven to be a very useful product in many other projects of mine).
4. Painting your design: You're about ready to start painting! First, however, with some painter's tape, tape your fabric to your working surface - paint will leak through the fabric no matter what, and if you move your fabric around, you might end up with some nasty surprises - read: some unintended "designs" on your fabric. So, make sure your fabric stays put! Also, to avoid any disappointment, read the manufacturer's instructions on your paint first! Most fabric paints need to get heat set. I used Raphaël - Iden'ko fabric paint, and I'm actually very pleased with how it turned out. I know Dharma Trading Co. has a huge selection of fabric paint - I used to order Dyna-flow silk paint from them, but for this particular project I believe Jacquard would be a very good brand (we've used this one with M.'s preschool class, to make handprinted aprons for the teachers as an end-of-year gift, picture here)
Unlike when painting on paper, dab the paint onto the fabric, using small amounts of paint at a time - do not rub as this will loosen up the fibers (especially when painting on linen). Also, make sure the paint is well spread at the edges, in order to get a clear outline. When done painting, allow the paint to dry, leaving the freezer paper on the fabric until completely dry. (Note:I added this last sentence mainly for myself, as I wasn't patient enough to wait and so peeled the paper off way before the paint being dry - nothing happened, but anyway, waiting is better!!). If your paint needs to be heat set, iron the fabric on both sides or throw it in the dryer (check the instructions on your paint first, though!!).
And that's it for part one!
I'll have part two - assembling the message board - up hopefully by tomorrow!
Please, let me know if something's not clear or if you have questions or suggestions!