Yesterday, it was back to school day for both of my girls. Slightly nervous and way too early we headed to school, their back packs full with their (new) school supplies. The sidewalks were crowded with parents and kids catching up again after not having seen each other for two months. All went well - they both ended up with their best friends in class and great teachers. I was really glad to see their happy faces when I picked them up from school and all the way back home the two of them were talking and talking enthusiastically about their first school day - little H. feeling all grown up now because she's started first grade and M. just grown up, because that's exactly what she is!
Back to school means school supplies and in M.'s case even more school supplies than we already took to school yesterday. She came home with another long list of things needed. It will be a busy year from what I see on that list! One of the things she'll be needing is a water bottle with bag, to hang the bottle from a hook at her desk. M. easy going as always just wanted to take a plastic bag. But I thought, I could do better: "Would you like me to sew you a water bottle holder?". "Are you sure, mommy? 'Cause I don't want to give you more work than you already have..." That's my sweet little girl! Always worried to ask for too much...
I didn't do any sewing for the entire summer (that is if I don't count the folding curtains I made - but that was a necessity rather than a fun project), and felt really happy about this new "assignment". Off I went to my sewing machine...
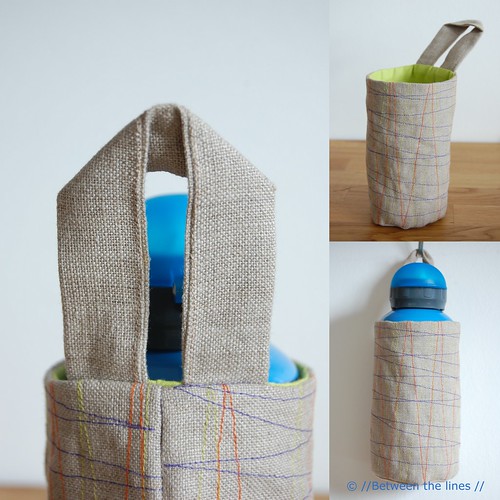
So, here's the water bottle holder for my little girl - made out of some linen (what else?!) I still had and some left over fabric from the folding curtains. Oh, and I used an old t-shirt of mine for the padding. I didn't intend on writing a tutorial at first so I didn't take any pictures of the in-between steps - something I really regretted this morning when I had another look at the finished product.
This project is rather simple, however. Therefore, I decided to just write down the steps so you can make a bottle holder of your own for school, for work or for the gym. Or you could use it as a comb and brush holder for the bathroom, I just came to realize, or as a kitchen utensils holder, pen holder, paint brushes holder...
This is what you'll need for this project:
- two pieces of fabric (outer fabric and lining)
- some cotton batting, or just a piece of an old t-shirt, the way I did
- thread, scissors, pins, sewing machine, iron...
1. On a piece of paper trace the circumference of your water bottle. Cut out. Next, measure height (H) and circumference (W) of the bottle and draw a rectangle measuring H by W on a piece of paper. Cut out.
2. Cut both pattern pieces out of each fabric, adding a 1cm seam allowance on all sides. From the outer fabric cut an additional strip of fabric measuring 10cm by 22cm, which you'll be needing for the loop. If you're planning on padding the holder, cut out an H by W piece from the t-shirt or batting, as well.
3. Optional: I top stitched the outer fabric with thread of different colors, stitching the outer fabric and padding together. I got the idea for the topstitching here and here (very nice projects - both of them!!). Make sure the two layers are pinned together really well so the bottom layer doesn't start shifting!
4. Sew the side seam of the outer fabric - do the same for the lining but leave a small opening half way (for turning the bottle holder, later). You have two tubes now.
5. Pin the circle to the bottom of the tube. To make this easier, what I usually do is fold the circle in half and mark the fold with my finger by going over it a couple of times and then fold it again, perpendicularly to the first fold. That way you obtain a circle divided in quarters. Do the same thing with the tube. These imaginary lines will help you to distribute the fabric of the circle evenly over the tubing fabric, by matching the folds on the circle with the folds on the tube. Use plenty of pins to keep everything together. Next, sew circle and tube together with your sewing machine. Do the same thing for the lining.
6. Loop: fold the strip lengthwise in half and press with an iron. Next fold each half lengthwise in half again by folding the selvages towards the first fold and press (the selvages are facing each other and the first fold now, sandwiched in the middle of the strip). If you don't get this, let me know! (There must be a better way to formulate this...) Now, sew the strip closed.
Note: you can also make a loop consisting out of two strips held together with a scratch closure, in order to hang the bottle holder from a stroller, shopping cart, ...
7. Pin both tubes together, right sides facing and sandwich the loop in between the two layers while doing so. Sew everything together.
8. Turn inside out through the side opening you left in the lining. Close the opening with a few stitches. Shape the bottle holder and press the top seam and loop flat.
Et voilà! Fini! A bottle holder or whatever-holder!
You know what? I really feel happy I wrote this down. I'm back on track!
Note: As always, let me know if something's not clear! I'm there to help!
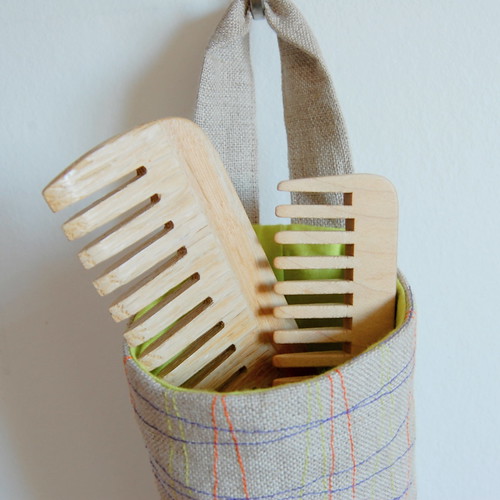
The water bottle holder put to a different use... Just an example.
I think I might have to make some more...
Please note, this tutorials is intended for personal use only. Therefore, do not reproduce, sell or commercialize in any form without permission. Thanks for understanding!

