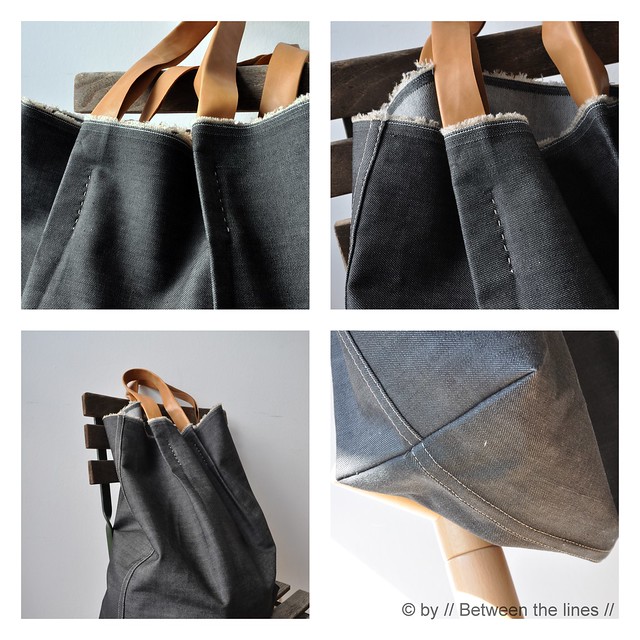
I found some spare time to finally write down the tutorial I promised last week. The bag has been used extensively lately, and I must say it's one of my favorites (didn't I say that of every single one of my bags?).
It's sturdy, carries quite a bit and yet it still looks elegant, if I may say so myself. And it's so simple to make. Ready?!
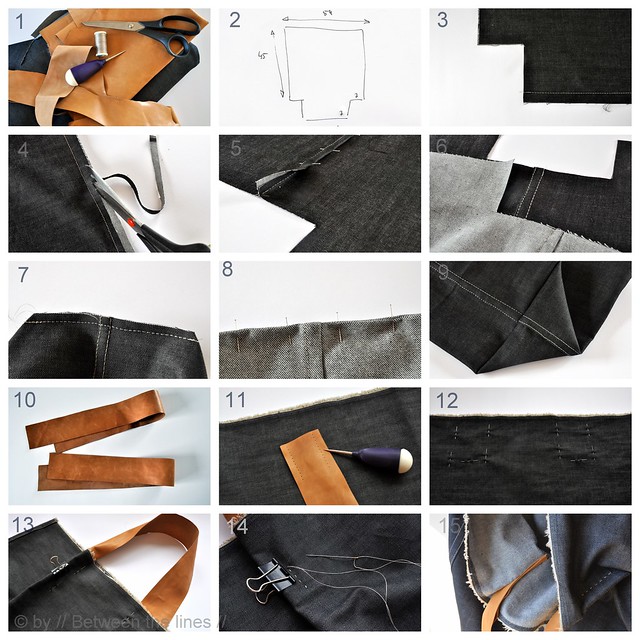
Here is what you need:
- enough denim, canvas, or any other heavy-weight fabric you have at hand to cut two 54cm x 52cm pieces from - the given dimensions include seam allowances for side seams and bottom seam (note: since I wanted to make use of the denim's nice selvedge (Yes, Cindy, you got that right - that was of course on purpose!!), I cut two separate pieces. You could of course take one long strand and fold the fabric in half - do not forget to adjust for the seam allowances in that case and to add some at the top as well.
- two 65cm x 6cm straps of leather
- an awl
- heavy duty thread and a ditto needle
- scissors
- large paper clips
- sewing machine
- iron
Instructions
1. Cut the fabric as shown in picture 2.
2. Bottom and side seams using the half French seam: on the sewing machine, sew the bottom seam closed on the right (!) side of the fabric, taking into account a 2cm (3/4'') seam allowance(picture 3).
Cut away half of the seam allowance on one of the pieces as shown in picture 4. Press the seam open. Fold the longer seam allowance over the shorter, tucking inside the shorter end and secure with pins (picture 5.). Now, sew into place ( picture 6). Repeat with both of the side seams.
3. Boxed corners using a French seam: on the right side (!) of the bag, fold the bag such that bottom seam and side seam align perfectly on top of each other. Pin and next sew together (on the right side!) (picture 7.). Press. Next turn the bag inside out, fold and tuck the first seam inside layers. Sew on machine making sure to use a slightly bigger seam allowance than in the previous step. The result should look as show in picture 9.
Note: for a good description of the different types of French seams and felled seams, check out Annekata's tutorial here.
4. Handles: I got the idea for the handles from the Japanese sewing book Making Leather Bags Lesson 1,2 by Umami Yoshimi Ezura - a gem really, that I recommend to anyone loving nice, simple and yet elegant bags.
At both ends of each strip of leather, make little wholes using an awl (picture 11), making sure the distance between wholes is equal and left and right on each side match perfectly. These wholes will help you sewing the handles to the bag more easily. If your leather is thin enough you could omit this step. Next, mark on your fabric where the handles should come (picture 12). Now, pinch your leather strip between the fabric, folding the leather strip in two (I ironed the fold of the leather handles - before you do this try on a little piece first to see how your leather responds to heat). Adjust such that the previously made wholes coincide perfectly. Secure with a large paper clip (picture 13). Sew into place with a heavy-duty needle and some heavy duty thread, using small stitches and going through the earlier made wholes. (I did every stitch twice to make sure the handles are tightly sewn to the bag.). And done!
As usually, if you have questions about this project just let me know! I'd be happy to help. Also, if you made something using a tutorial found on this blog or if you got inspired by something you found here, make sure to post your pictures here.
Good luck!
As with all tutorials found on this blog, please note this tutorial is intended for personal use only. Therefore, do not reproduce, sell or commercialize in any form without permission. Thanks for understanding!

